Online privacy requirements have become increasingly intense in recent years. One of the measures that has been in place for several years is the cookie banner. Website users should give conscious consent to different types of cookies. In particular, as a marketer, you want to be able to use as much data as possible from analytics and marketing cookies. However, you also want to comply with the GDPR. To help you tailor cookie behavior to the consent level, Google has introduced Consent Mode.
Consent mode helps you adjust tags behavior based on the website user’s preferences. However, it is so far only available in the Web container. Can’t you use this in the server container then? Yes, but you have to set it up yourself. In this blog, we explain to you step by step how to do this.
In this blog, we use Cookiebot (Cookie Consent Management System) as an example.
Table of Contents
What types of cookies are there?
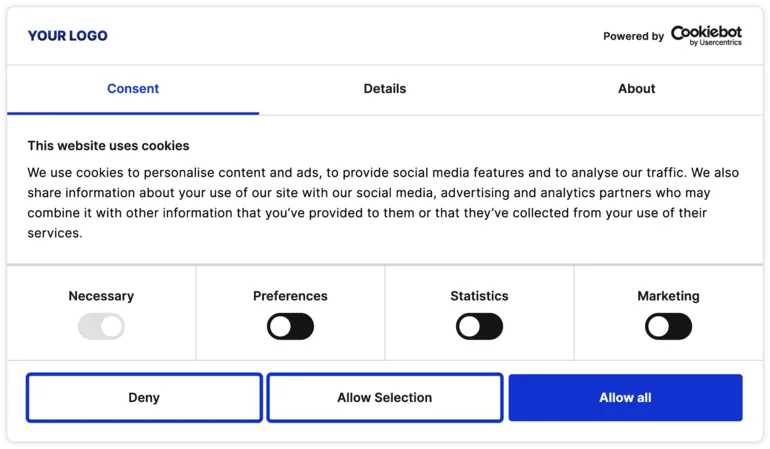
Cookies are used for many different applications. Roughly speaking, we can distinguish 4:
- Necessary cookies: These cookies are essential to the functioning of a website. For example, they allow users to log into a secure area of the site or add items to a shopping cart when shopping online.
- Preferences: These cookies allow a website to remember choices users make (such as language preferences or custom settings) and provide enhanced and personalized features. They can also be used, for example, to play videos or display social media buttons.
- Analytical cookies: These cookies collect information about how users use a website, such as which pages are most visited or any error messages they receive. This data is used to improve the performance and functionality of the website.
- Marketing cookies: These cookies are used to display advertisements relevant to the user. They may collect information about a user’s browsing history and share this information with third parties, such as advertisers.
Thus, the use of cookies may be necessary for the functioning of the website, but it may also serve the purpose of learning more about users or using them for its own marketing campaigns.
For more explanation, check out our blog on the difference between first-party cookies and third-party cookies.
Privacy regulations such as the GDPR require that you, the user, have a choice about which cookies you do/don’t want to accept.
Consent Mode V2
Google Consent Mode V2 is an advanced version of Google’s framework for Administering user consents on Web sites, especially in light of stricter privacy laws. This update is critical for website owners and marketers using Google’s advertising and analytics products. Here is a general explanation:
Background and Need for Update
The rise of privacy laws and the demise of third-party cookies and mobile identifiers has led to the need for a more sophisticated approach to consent management. Google Consent Mode v2 comes in response to this changing digital landscape.
Key Features
This new version introduces two additional permission states: ‘ad_user_data’ and ‘ad_personalization’.
ad_user_data: Gives permission to submit user data to Google for advertising purposes. Users must explicitly consent via a cookie consent banner.
ad_personalization: This Administers the use of data for personalized ads, such as remarketing. Again, explicit user consent is required.
Comparison with Previous Version
Unlike the original Google Consent Mode, which focused primarily on data collection, v2 goes a step further by regulating how this data is used and shared.
Implementation
Effective implementation of Google Consent Mode v2 requires updating the Google Tag Manager (GTM) CookieScript template. This ensures that the website functions correctly under the New permission rules.
User impact
Companies that want to continue using Google ad products must switch to Google Consent Mode v2 by March 2024. Not doing so can lead to limitations in online marketing and user engagement opportunities.
Model Types
Google offers two deployment models – basic and advanced. These should be chosen based on legal requirements and desired outcomes. Both models support conversion modeling within Google Ads.
Consent Management Platforms (CMP’s)
For a smooth transition to Google Consent Mode v2, it is recommended to use a Google-certified CMP. These platforms help to Administer cookie banners and respect users’ consent preferences. We use Cookiebot as the CMP in this example.
Why Consent Mode & Server Side Tracking are indispensable with each other
1. Behind the Cookie Banner: Consent Mode is more than just a cookie banner, it is a system that enables data modeling. But to model data, data is needed. With the phasing out of third-party cookies, server-side tracking becomes essential for collecting this data, transforming third-party cookies into first-party cookies.
2. More Relevant Data: The combination of server-side tracking and consent mode allows you to collect more relevant data, resulting in more accurate data analysis. This is crucial for companies striving to make data-driven decisions.
3. Comply with Privacy Laws: This combination enables compliance with strict privacy laws while collecting valuable data. Consent mode gives users control over their data, while server-side tracking ensures continuity of data collection.
Conclusion: Consent Mode and Server-side tracking are a powerful duo. They not only ensure compliance with privacy laws, but also improve the quality of the data collected.
Consent Mode V2 in Google Ads.
Below, we explain the core aspects and operation of Consent Mode V2 in Google Ads. One of the main features of Consent Mode v2 is the ability to send certain non-personal data to Google for conversion modeling. These cookie-free pings include non-identifiable signals such as:
- Device Type
- Type of conversion
- Country
- Time of day
- Browser Type
This information is important for activating Google Ads algorithm for conversion modeling.
You have a daily ad click threshold of 700 ad clicks over a 7 day period, per country and domain grouping. This is needed for the consent mode algorithm to start learning the learning period.” (Source: Google Ads)
Once this threshold is met, cookie-free pings become active. This means that even if users do not consent to cookies, Google Ads still receives certain non-identifiable data. This data allows Google to create conversion models based on historical data.
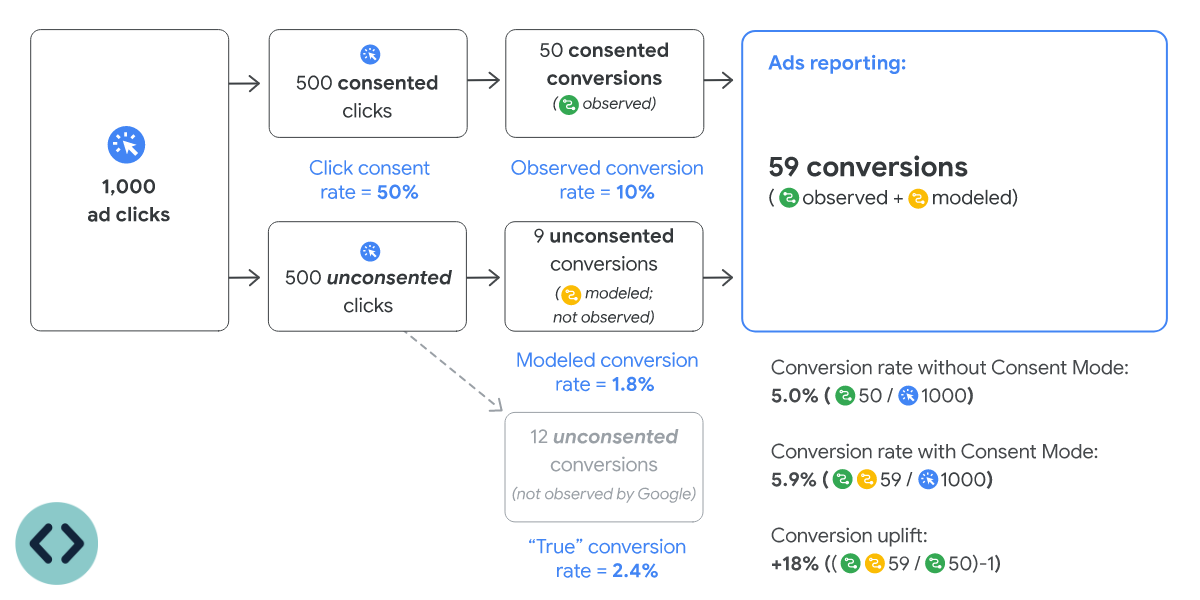
In addition, Consent Mode v2 facilitates remarketing activities without the use of cookies. This is an important development in online advertising, as it allows advertisers to remain effective in their campaigns while respecting users’ privacy.
Setting Consent Mode in the GTM
Now that you know what Consent Mode V2 is and what its benefits are we are going to set it up. Asking the user to agree to cookies is relatively simple. There are dozens of software/plugin solutions you can use for this. Google has released a list of certified Consent Management Platforms (CMPs) that meet the new requirements for showing ads in the EEA and the UK.
However, it becomes more complex when you need to match the behavior of the cookie banner with the actual firing of tags & cookies in Google Tag Manager.
To make this easier, Google has developed Consent Mode. Consent fashion specifically helps you with analytical and marketing cookies. It adjusts the behavior of cookie based on user preferences so that only user-approved tags are activated. This provides a more transparent and auditable way to respect user privacy while extracting valuable insights from your data.
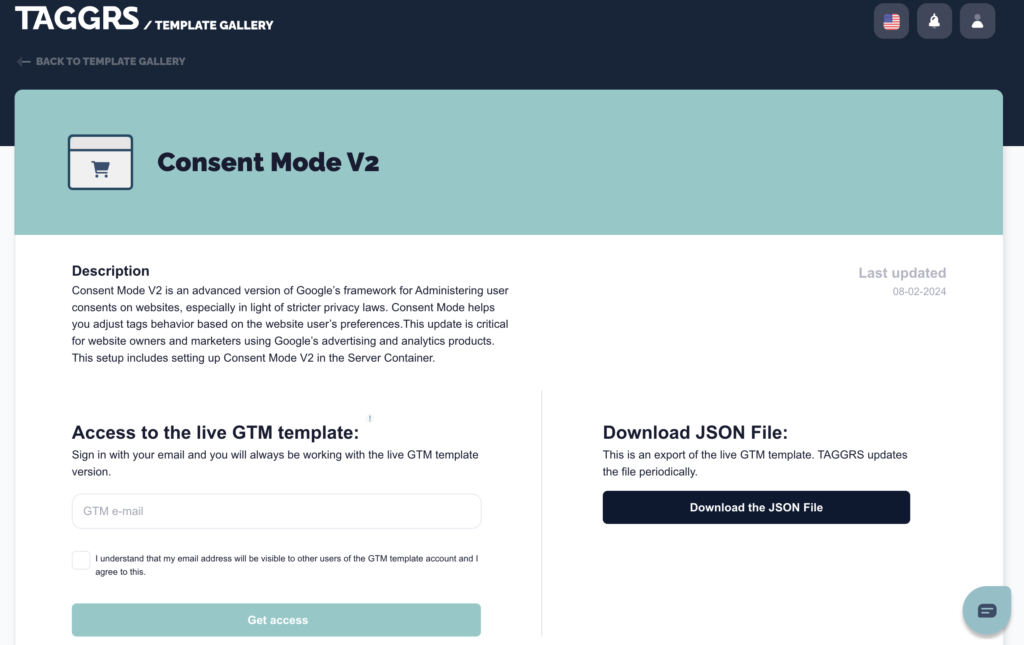
Tip: Go to the TAGGRS Template Gallery and get access to the Consent Mode V2 GTM Template.
Set Consent Mode in GTM Webcontainer (Client side).
To implement consent mode in the server container, you must first apply it in the Web container. Below is an explanation:
Consent mode setup Google Tag Manager client side
Total Time: 10 minutes
1. Container settings
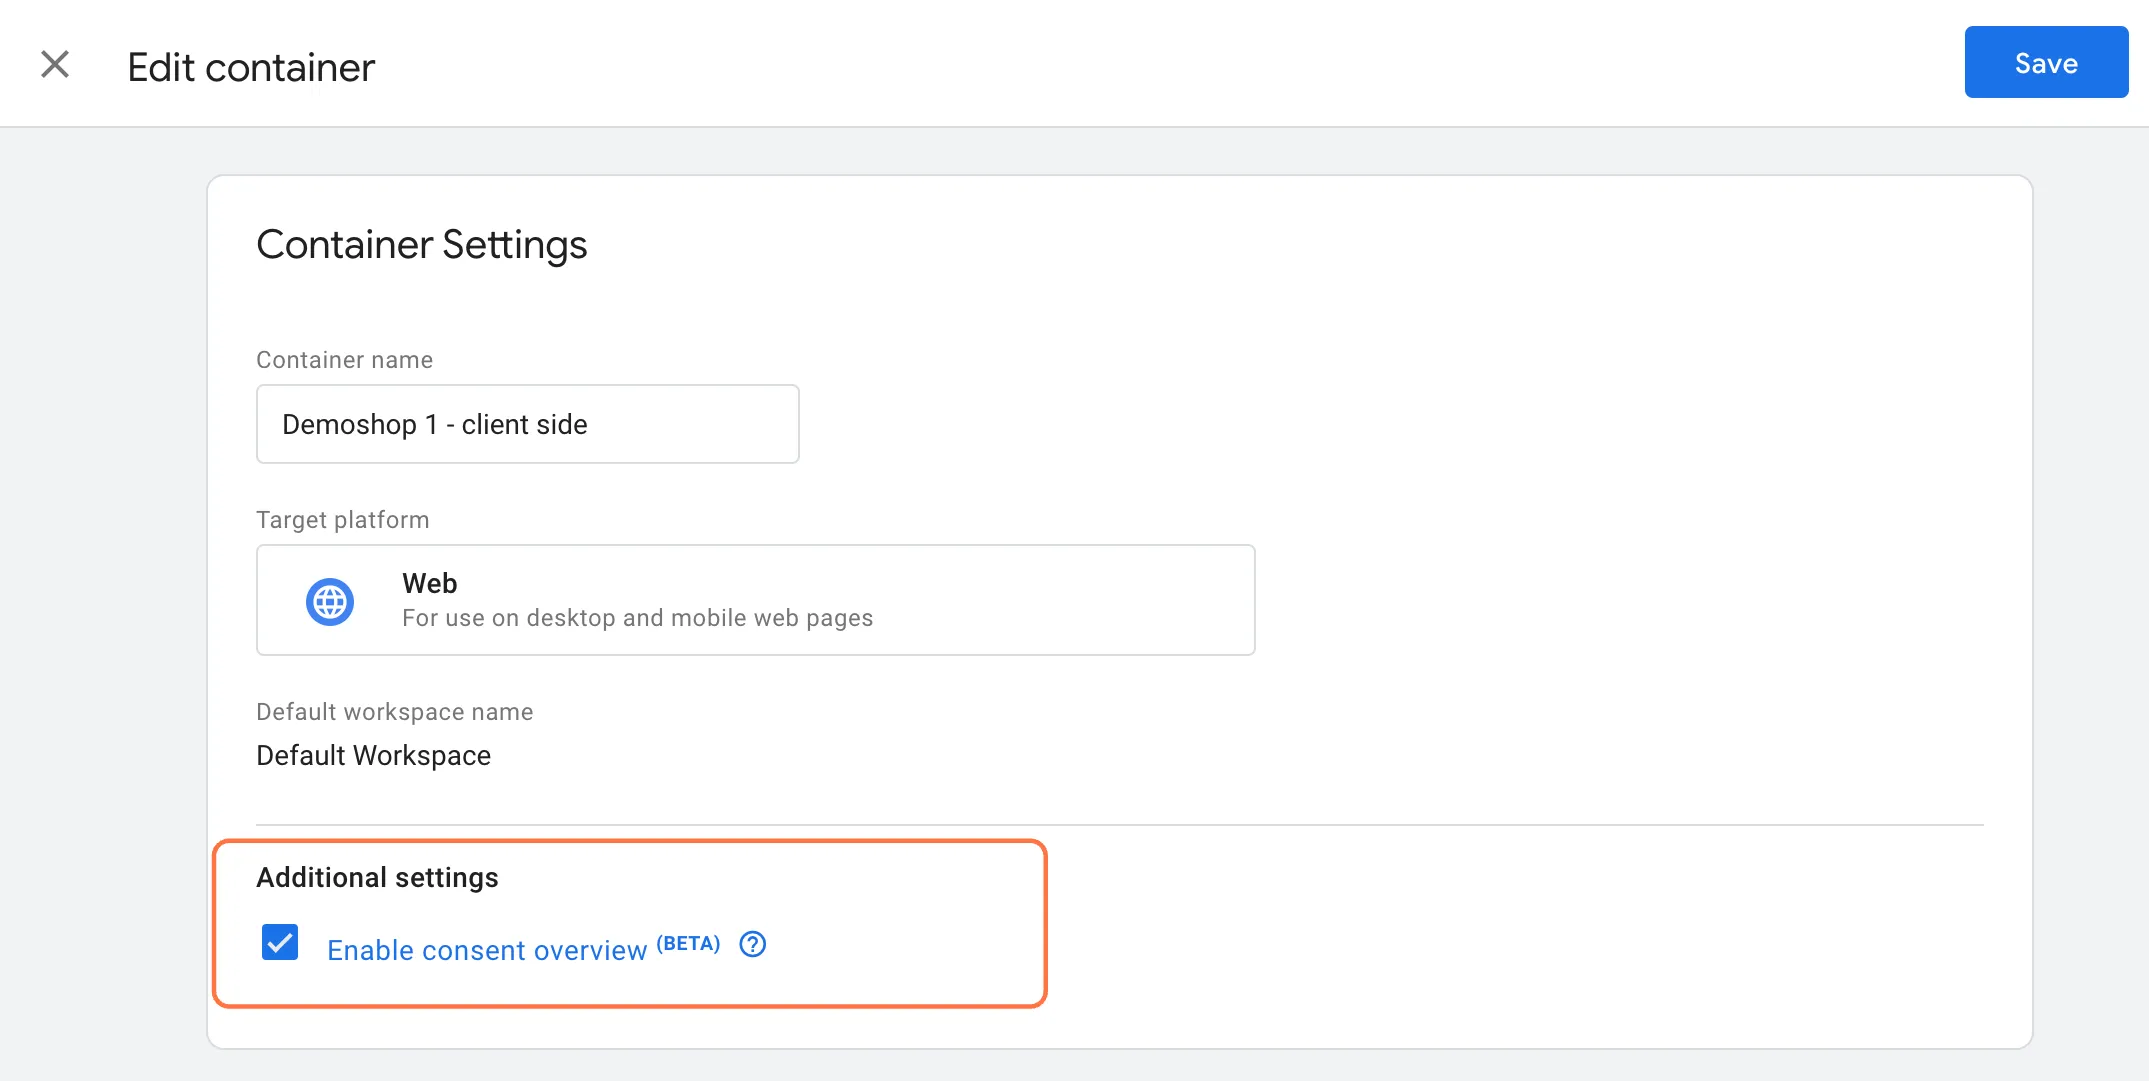
Within your webcontainer (client-side), go to Admin –> Container settings and under Additional settings, click Enable consent overview. Then save the container.
2. Cookiebot CMP Tag creation (Web Container).
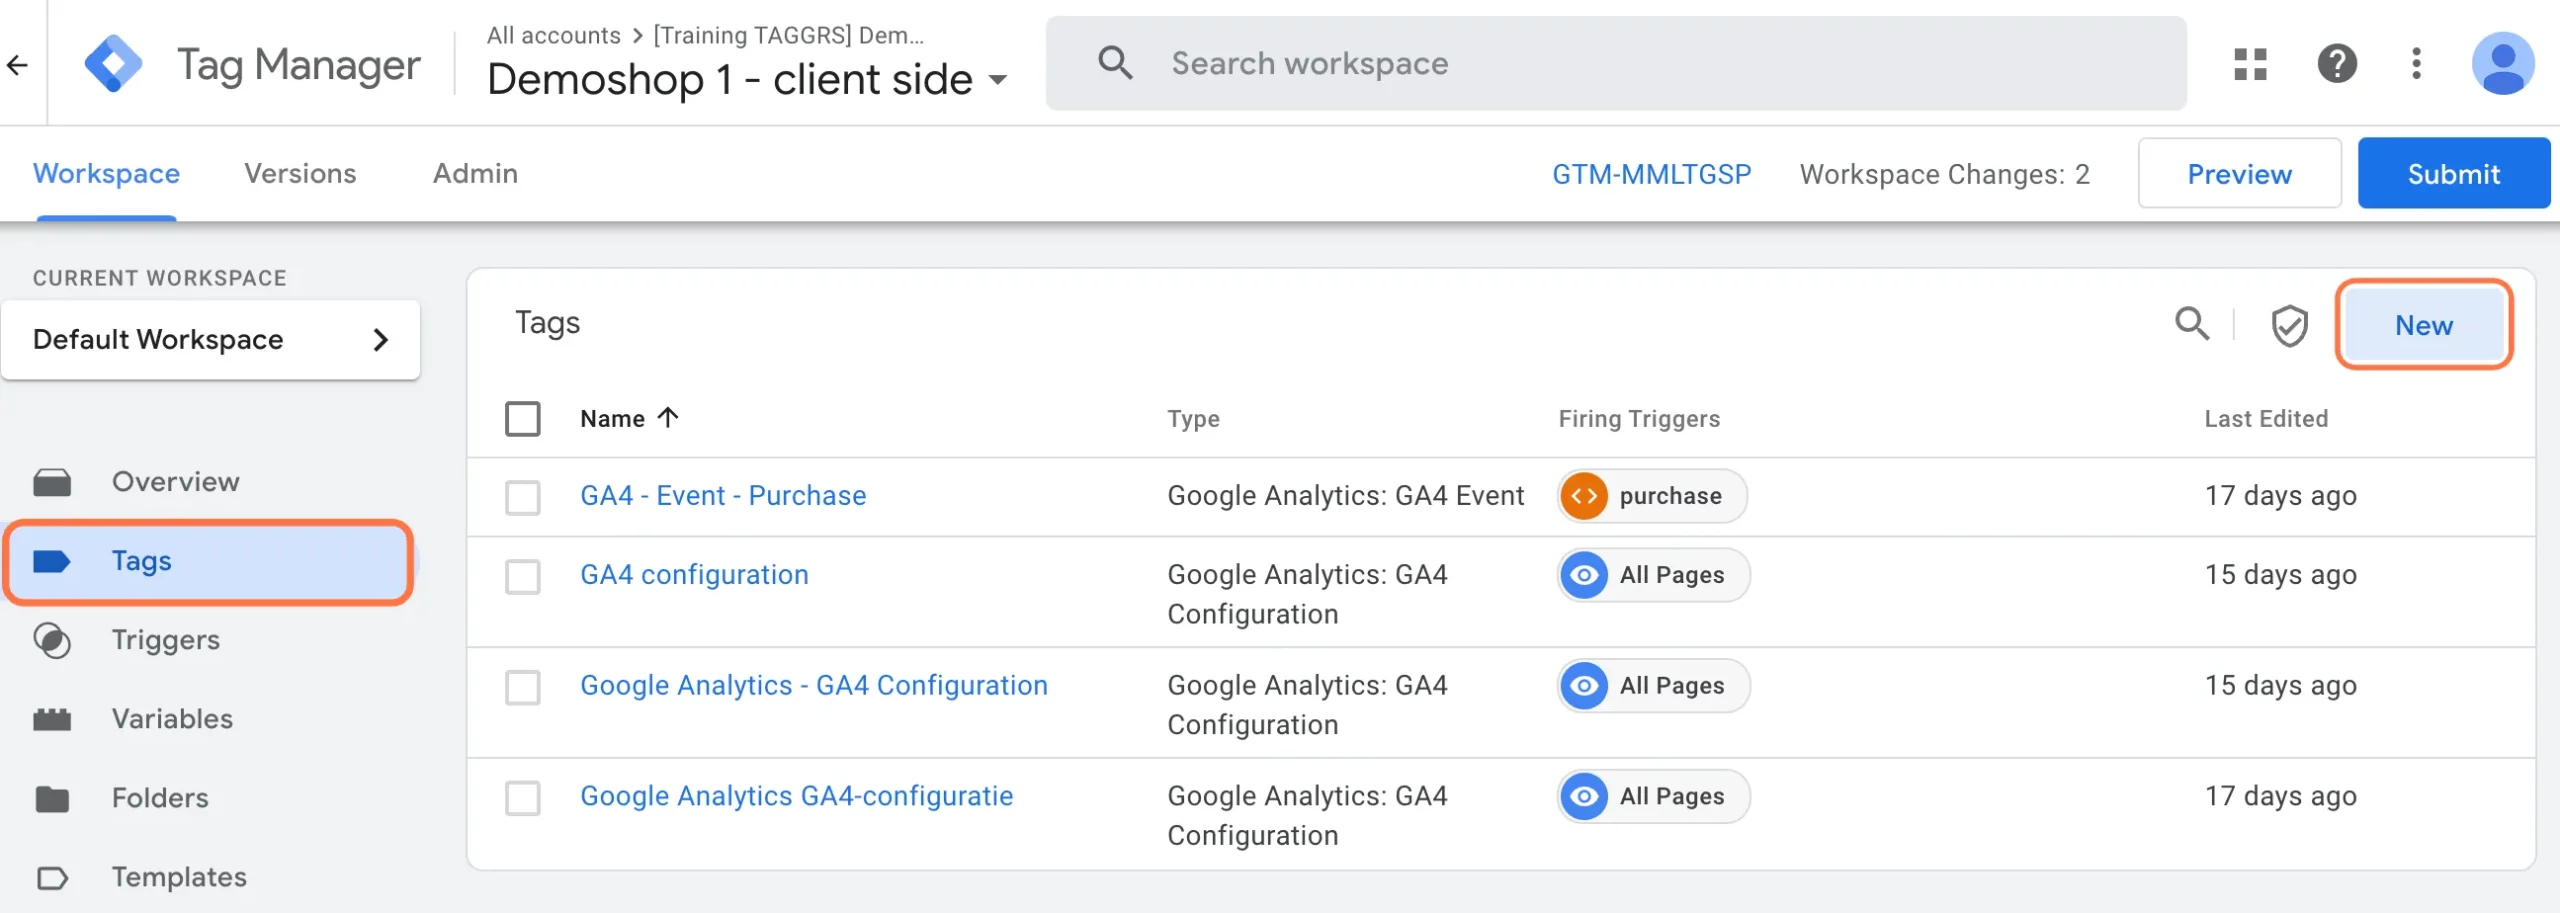
Next, we need to start creating a tag. Within your workspace, click Tags and click New. Then give the tag a name such as: Cookiebot CMP – All pages.
3. Cookiebot CMP Tag Configuration (Web Container).
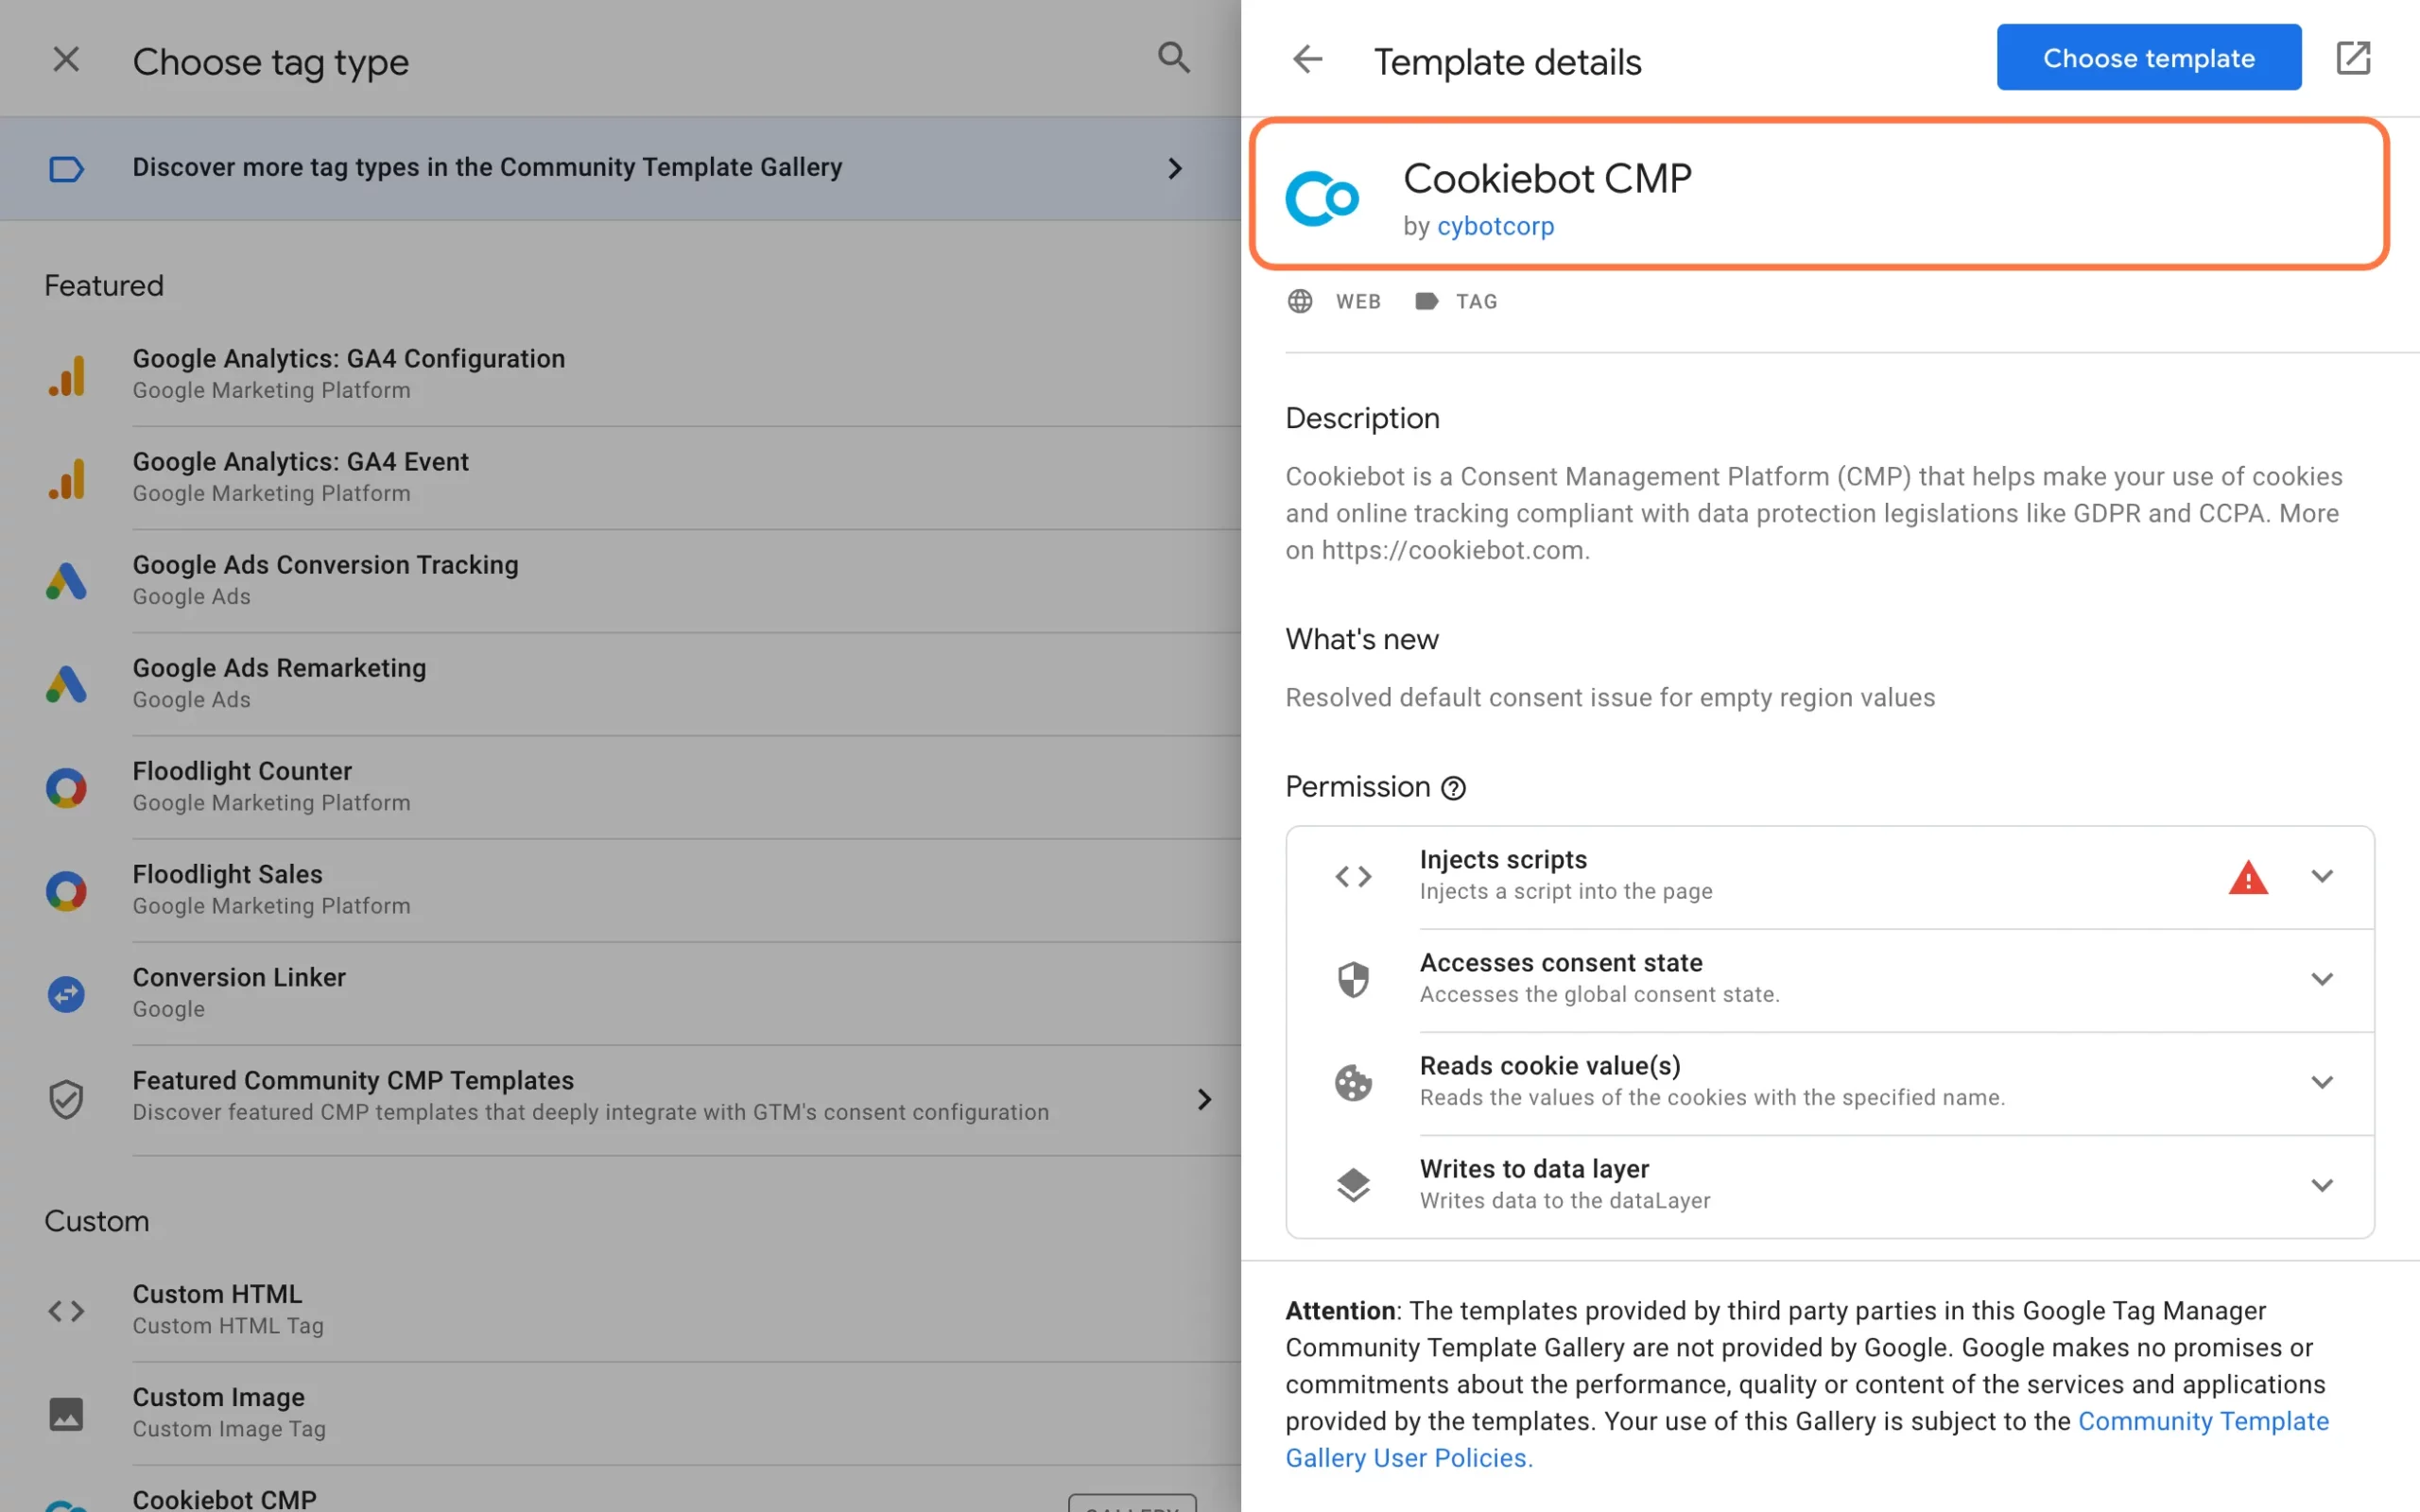
First, click Tag Configuration. Under Choose tag type, click Discover more tag types in the Community Template Gallery. In the templategallery, search for Cookiebot and select: Cookiebot CMP.
4. Cookiebot CMP Tag setup (Web Container).
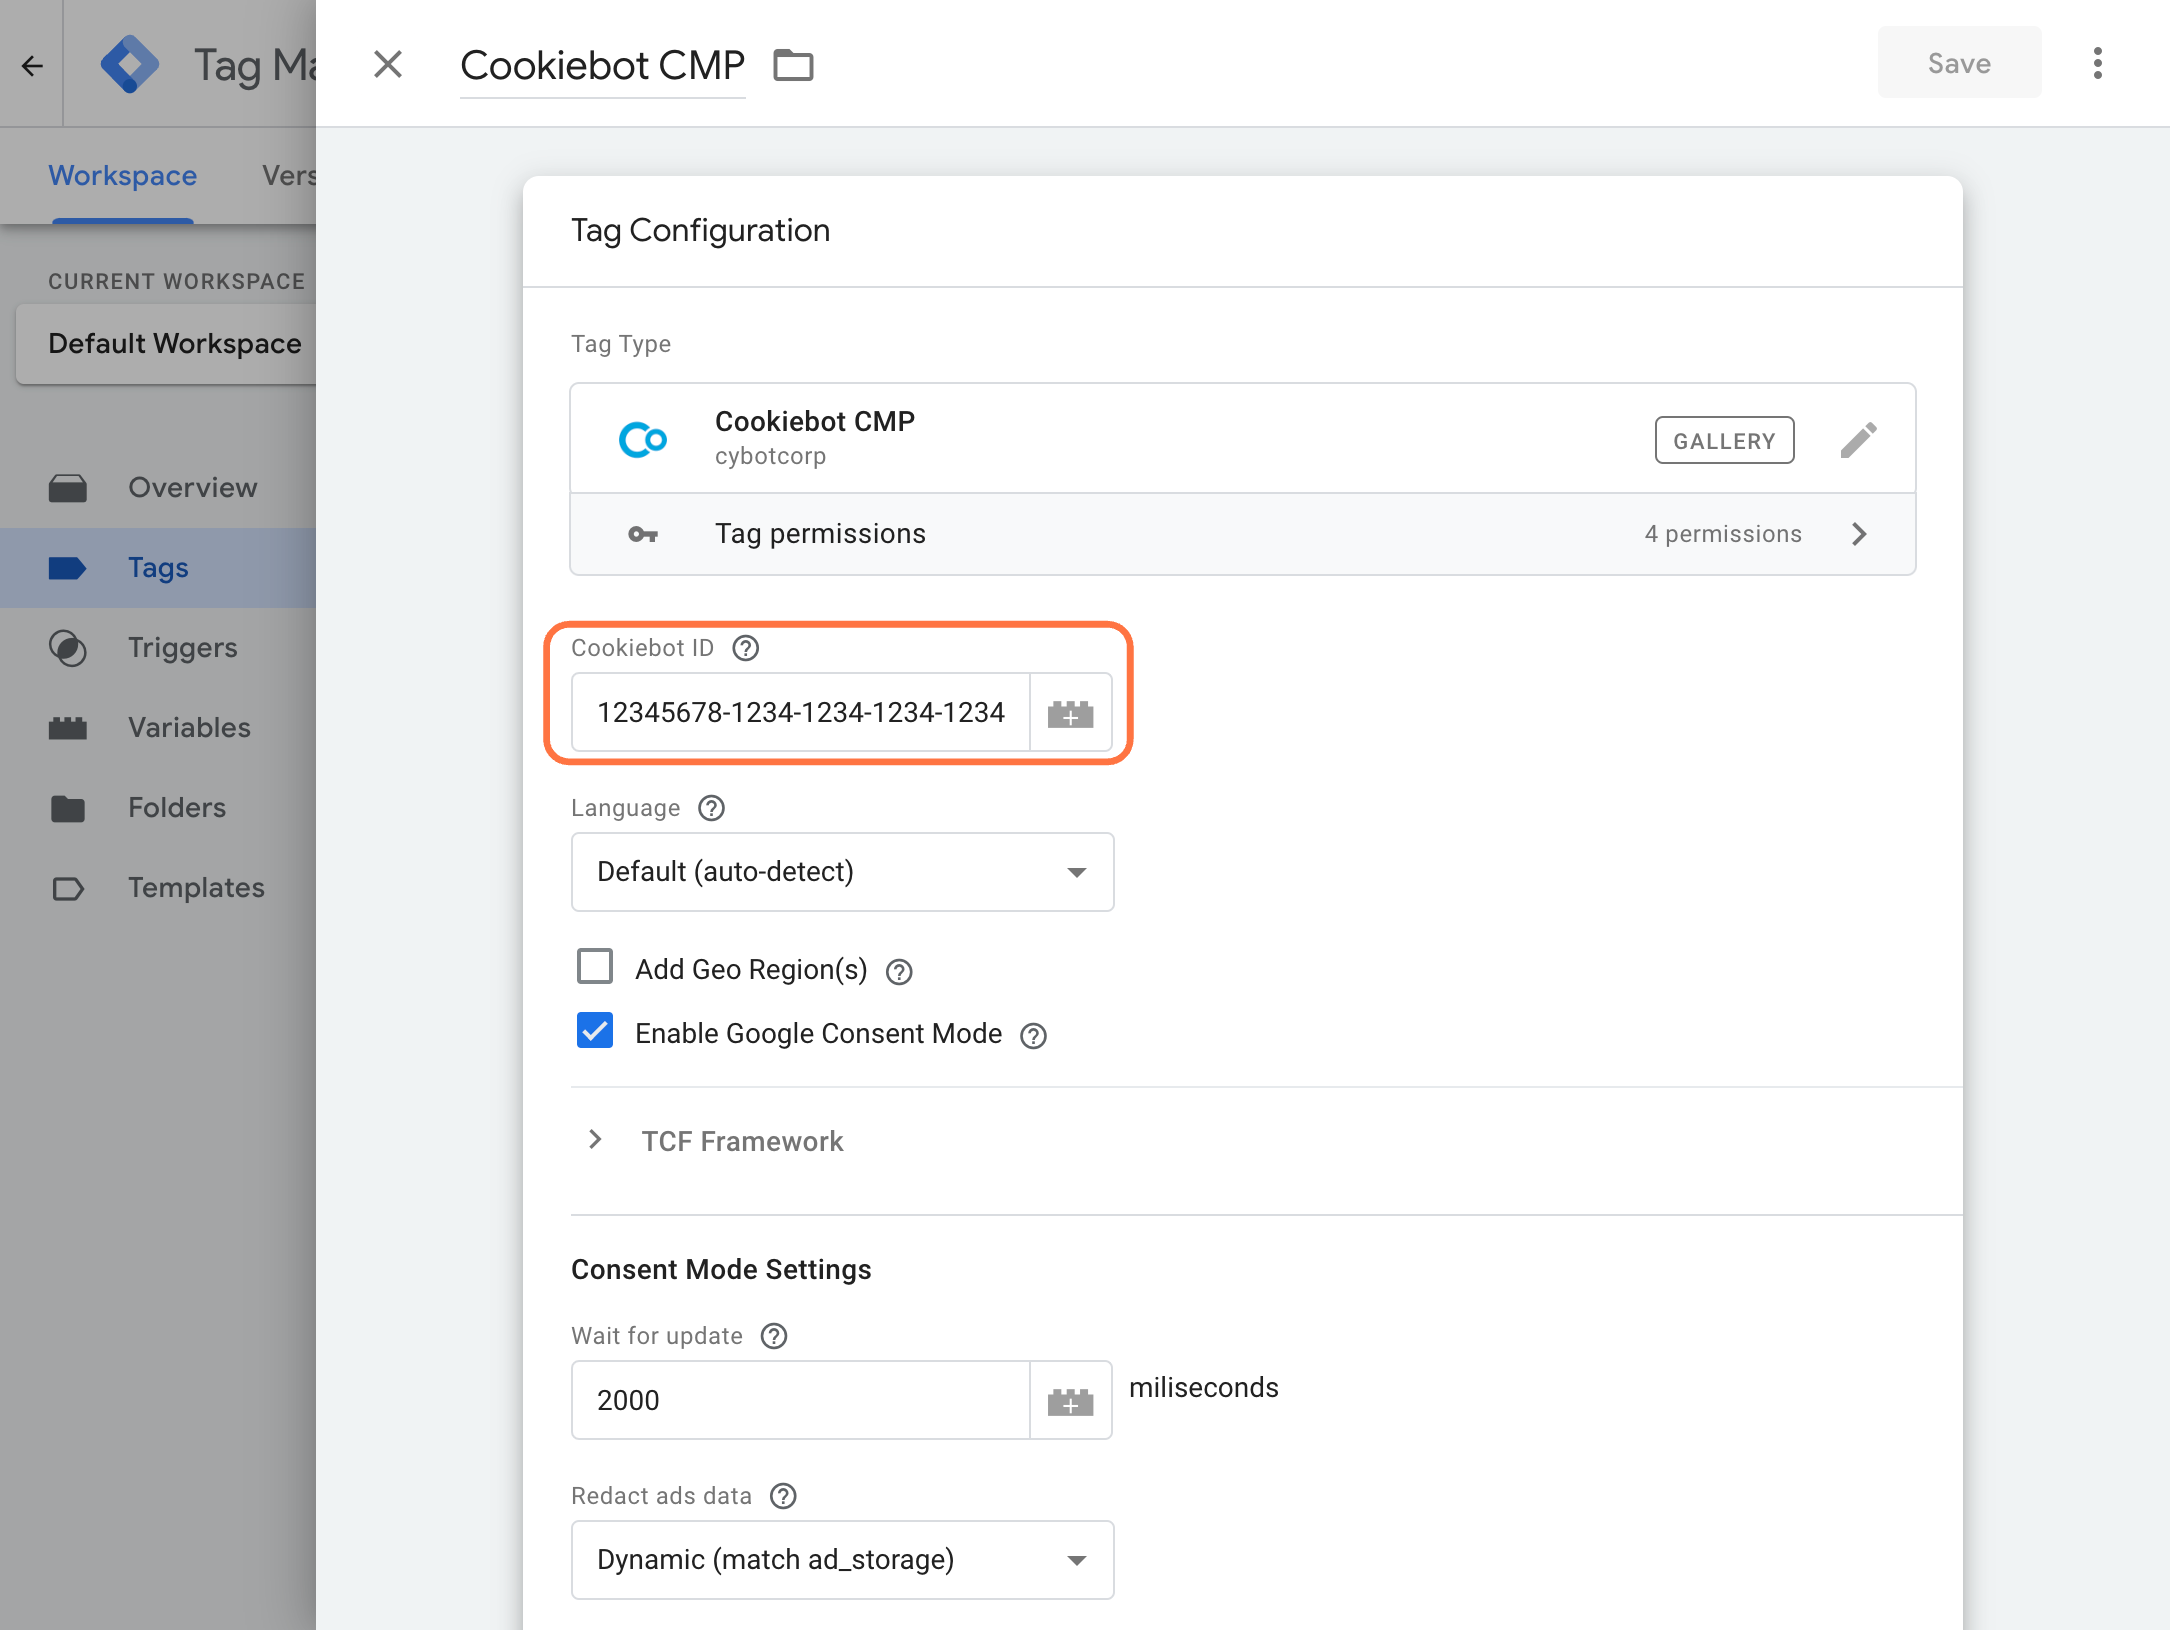
Next, you need to enter Cookiebot ID . You can find these within your Cookiebot account by selecting your domaingroup and then clicking on Your script. Here you see Domain Group ID listed. You then enter these within Google Tag Manager.
5. Cookiebot CMP Trigger setup (Web Container).
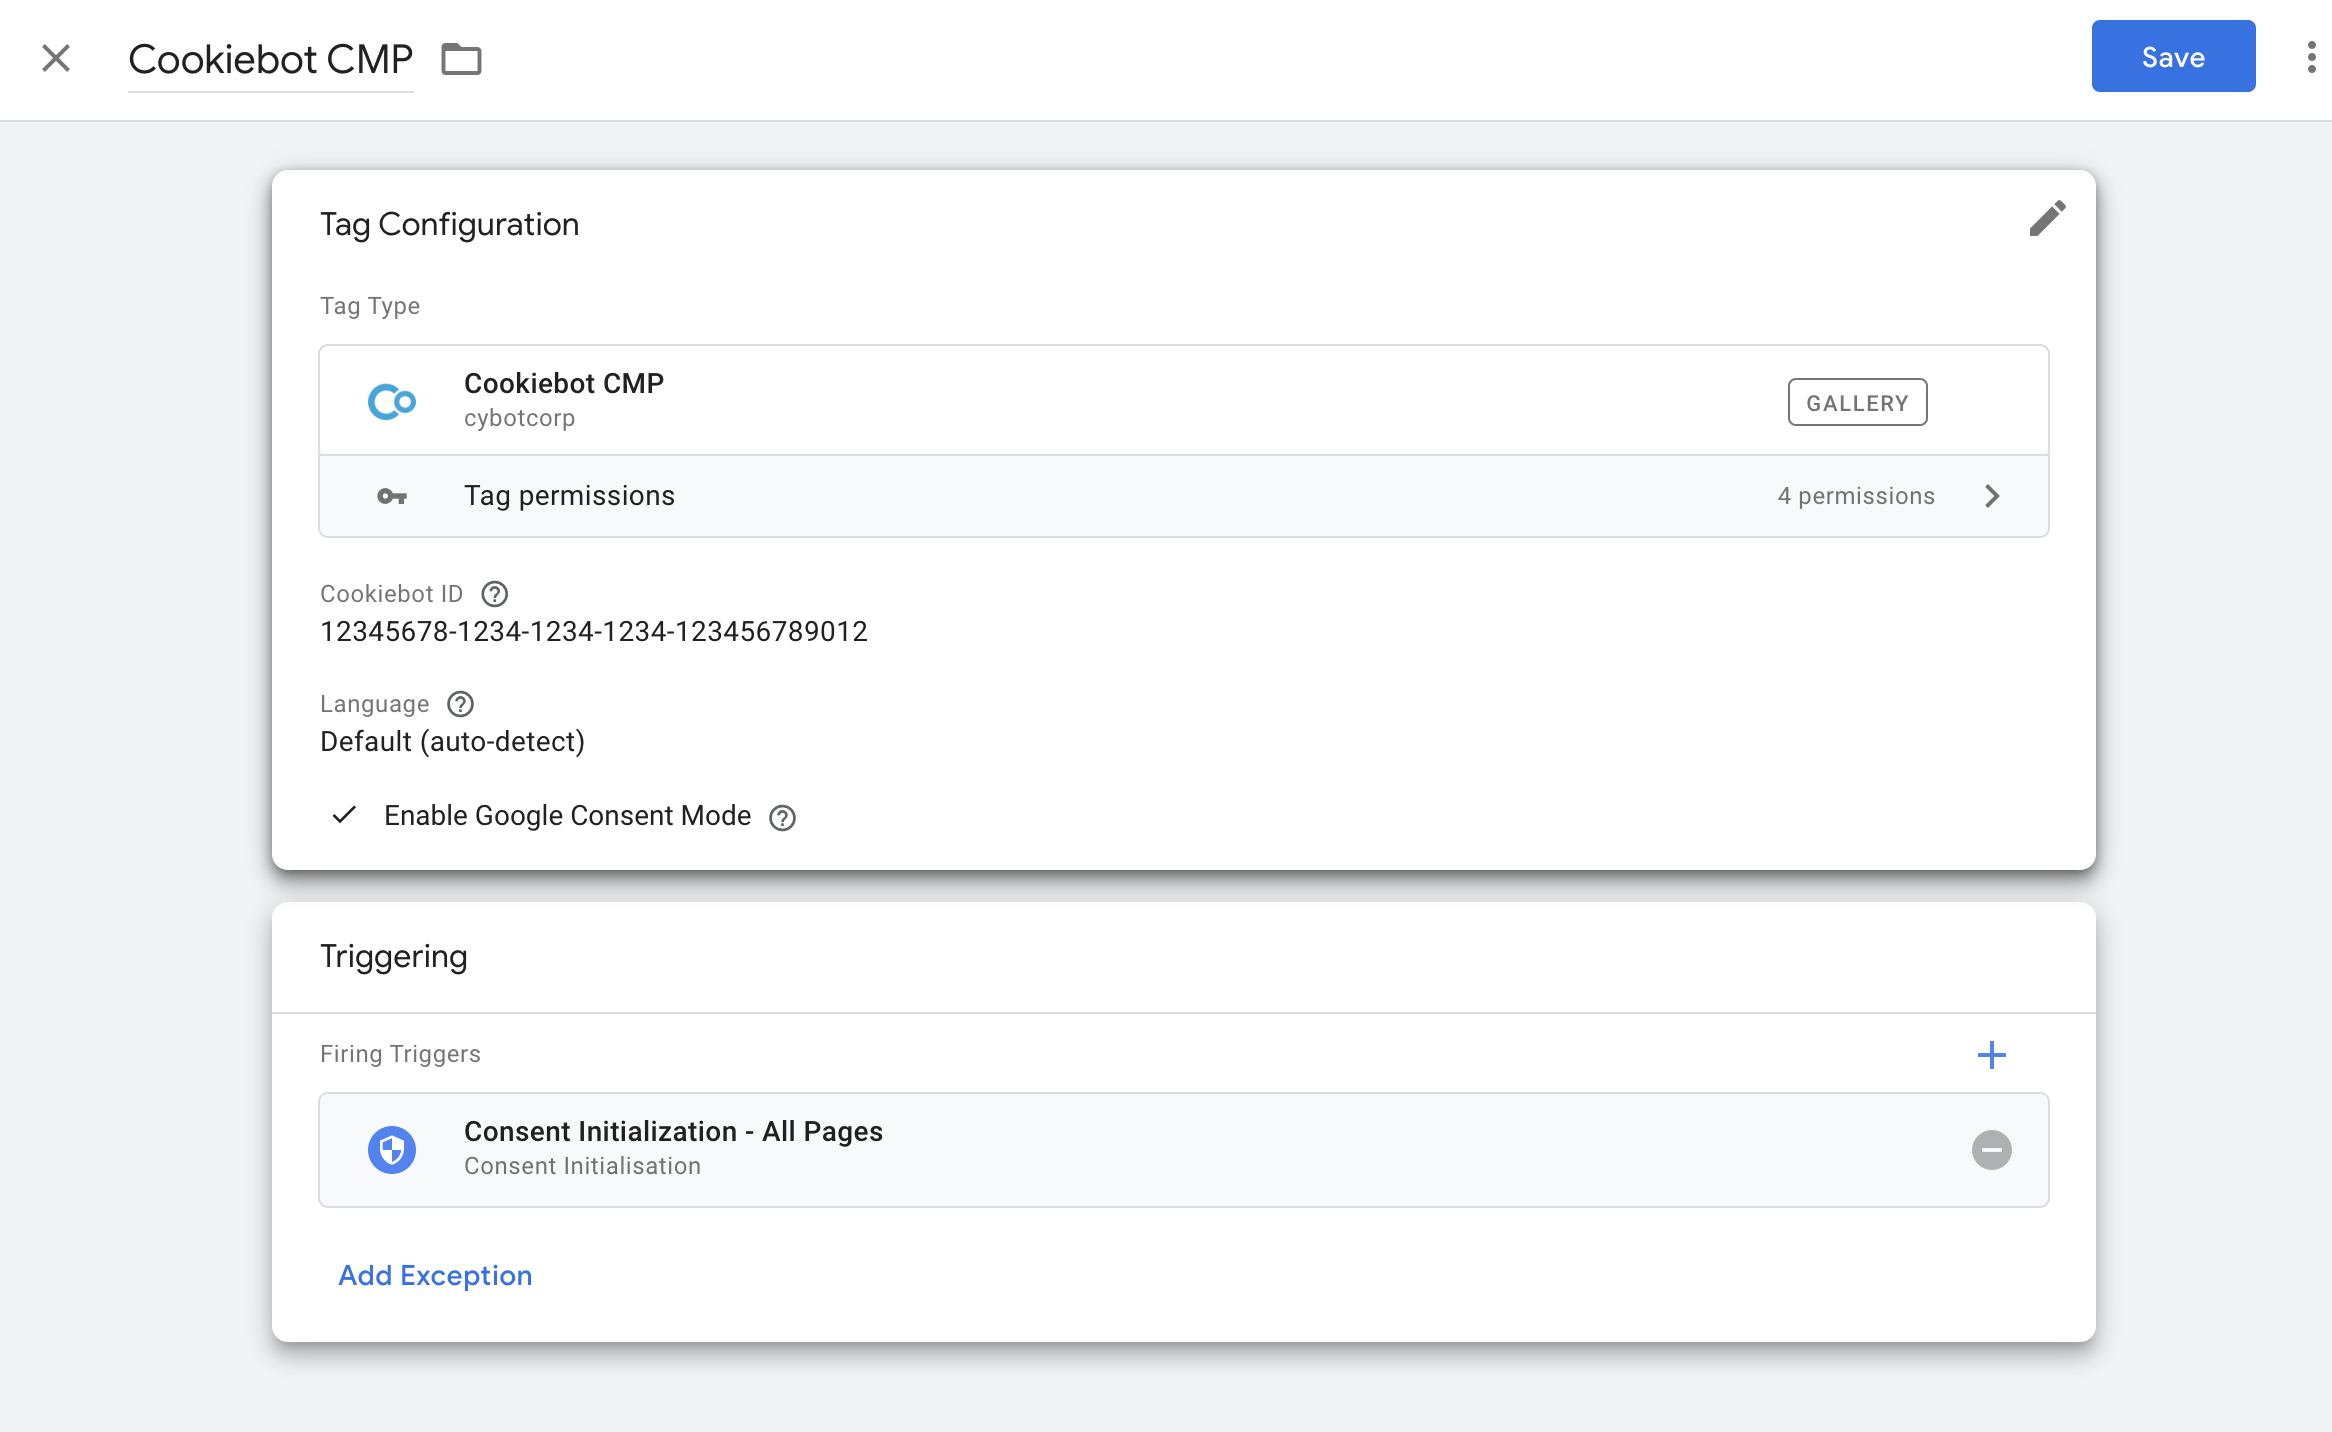
Next, you need to set your trigger. Click Triggering and here choose Initialization – All Pages. Then save the tag.
In most situations, there is no need to make additional adjustments for tags such as Google Analytics , Google Ads Tag and the Conversion Linker-tag. In fact, these have built-in permission controls of their own. Remember to check this within the CMP documentation.
Some situations do require additional adjustments, such as the Facebook Pixel. To do this, you need to create a custom event and add it to the tag. We explain this in the next step.
6. Create Trigger
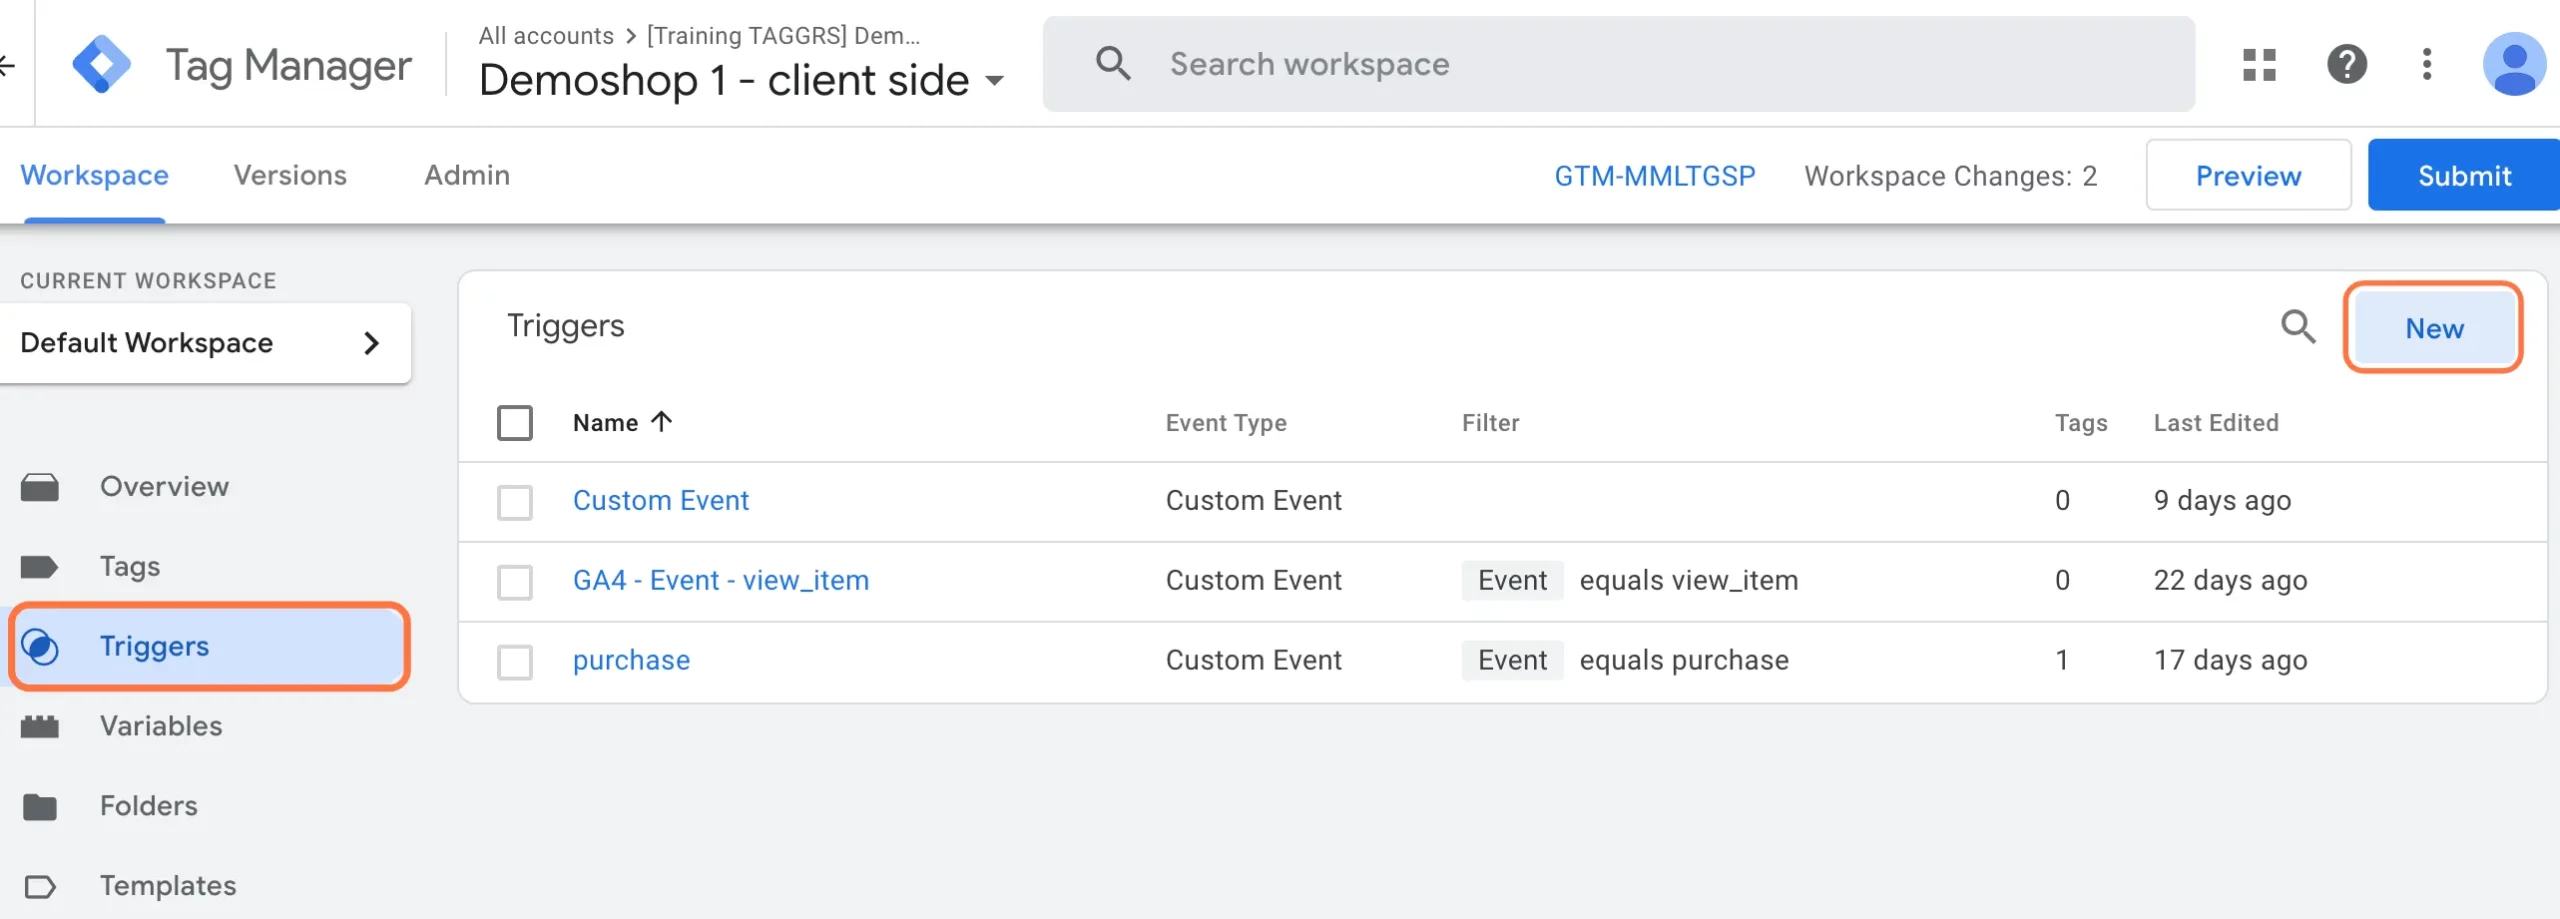
Go to Triggers and click New.
7. Set Created Trigger (Web Container).
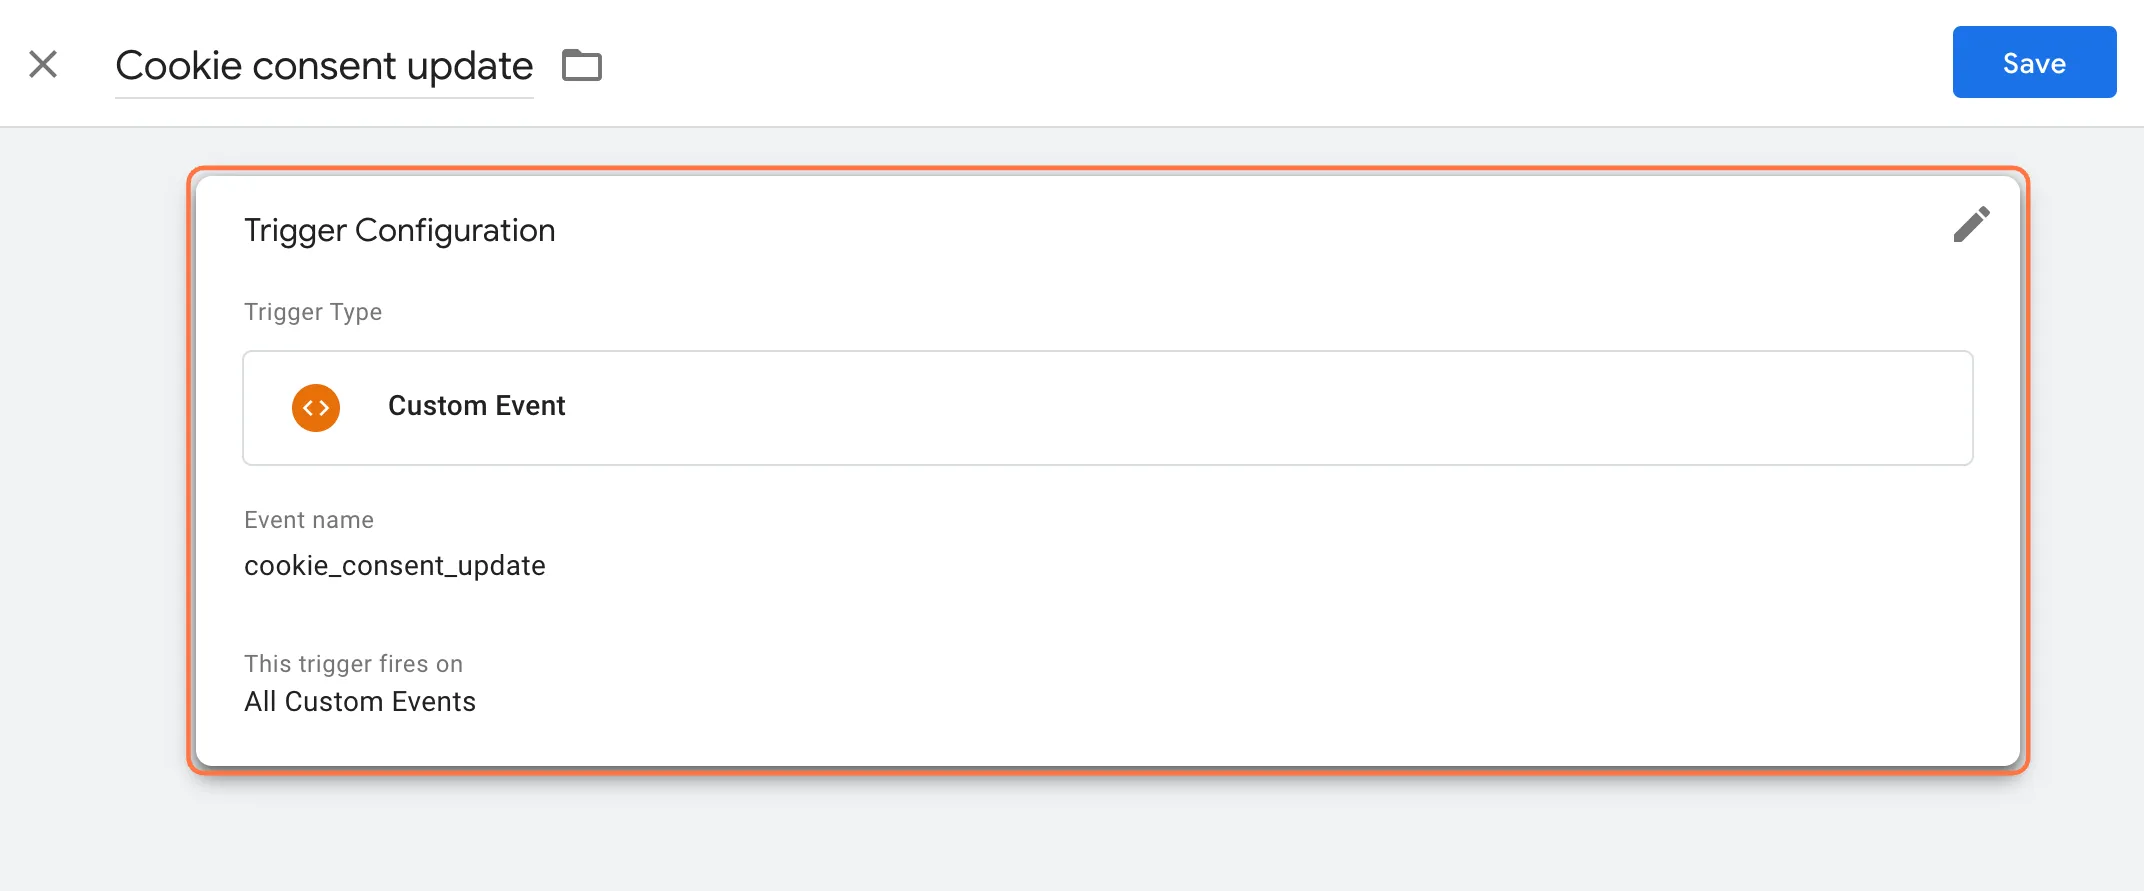
Click Trigger Configuration and choose Custom event here. Then specify cookie_consent_update as the Event name. Under This trigger fires on, make sure All Custom Events is checked. Then save the trigger.
8. Customize Trigger of Tag

Next, go to the Tag requiring additional adjustments, in this case the Facebook Pixel. Click this tag and replace the Trigger with cookie_consent_update (the trigger you just created). It is the replacement for the all pages trigger.
9. Marketing cookies.

On the TAGGRS website, you can choose which cookies you accept and which you do not. You can choose Marketing / Preferences / Statistics (Necessary required). We now need to ensure that these different levels of consent are forwarded. This means that if someone does not accept marketing, Google Tag Manager preferences / statistics data will still be sent. If you don’t, for example with ad_storage the data is only forwarded when the marketing cookies are accepted.
For consent mode v2, ad_user_data and ad_personalization have been added. The variable Cookiebot – Consent reads only the categories from Cookiebot (marketing, preferences & statistics). As a result, these two variables cannot be read.
Cookiebot maps its own categories to the types according to consent mode as follows. Basically, New types are read out, but fall under the category of marketing.
- ad_storage = Marketing
- analytics_storage = Analytics
- functionality_storage = Preferences
- personalization_storage = Preferences
- security_storage = Default granted
- ad_user_data = Marketing
- ad_personalization = Marketing
The above types can also be read instead of Cookiebot’s categories. For this I made a new container, see attachment.
This container contains a template variable Consent State. This reads the status of cookie storage and returns“denied” or“granted.” For this, a separate variable must be created for each type. These can then be added as parameters to the Google Tags.
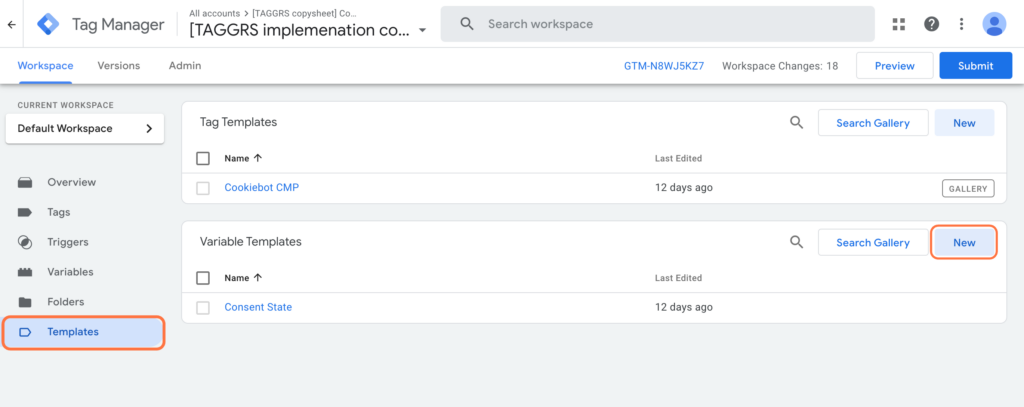
10. Upload new template (Web Container).
To choose the Consent State by state, we need to upload a Templates. Go to Templates and click New.
When you’re in the Templates Editor click on the 3 dots in the upper right corner and click import.
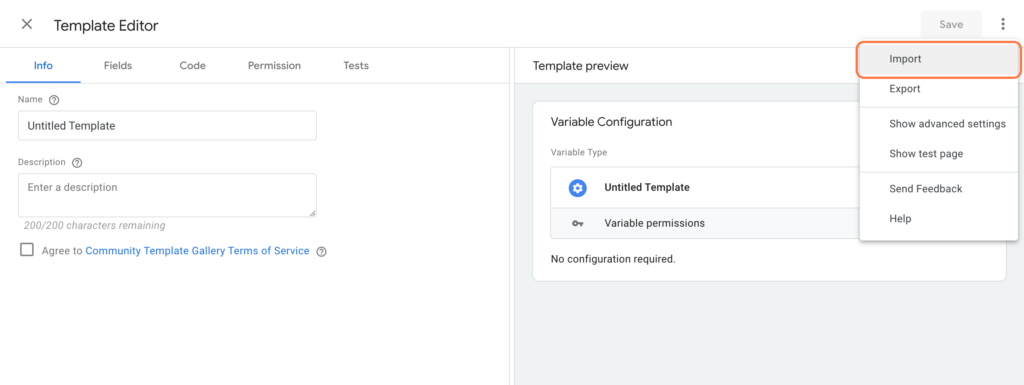
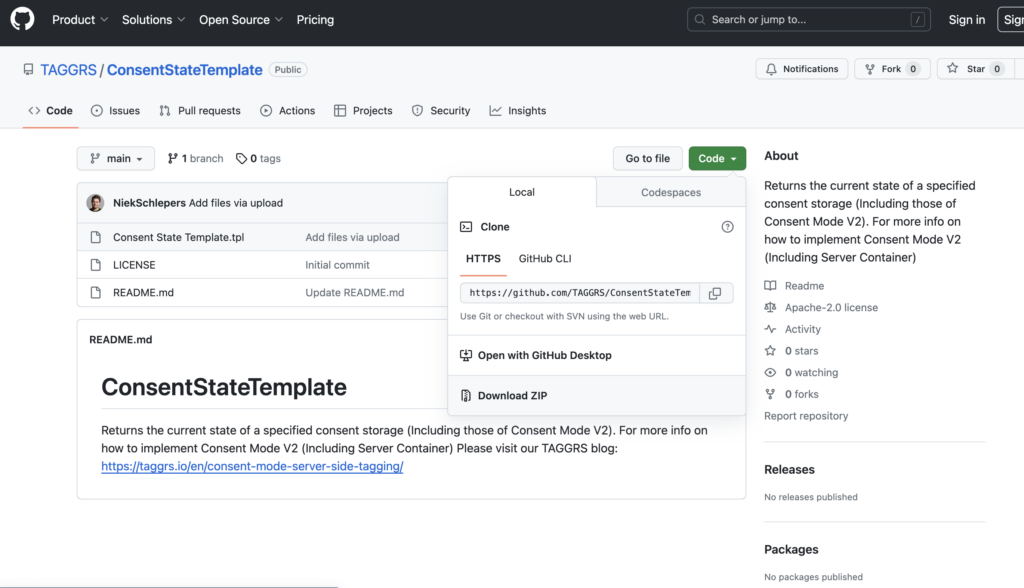
Next, add the Consent State Template via GitHub by clicking on Code and Download ZIP. Import and then choose Save to save the template.
11. Create New Consent State Variable (Web Container).
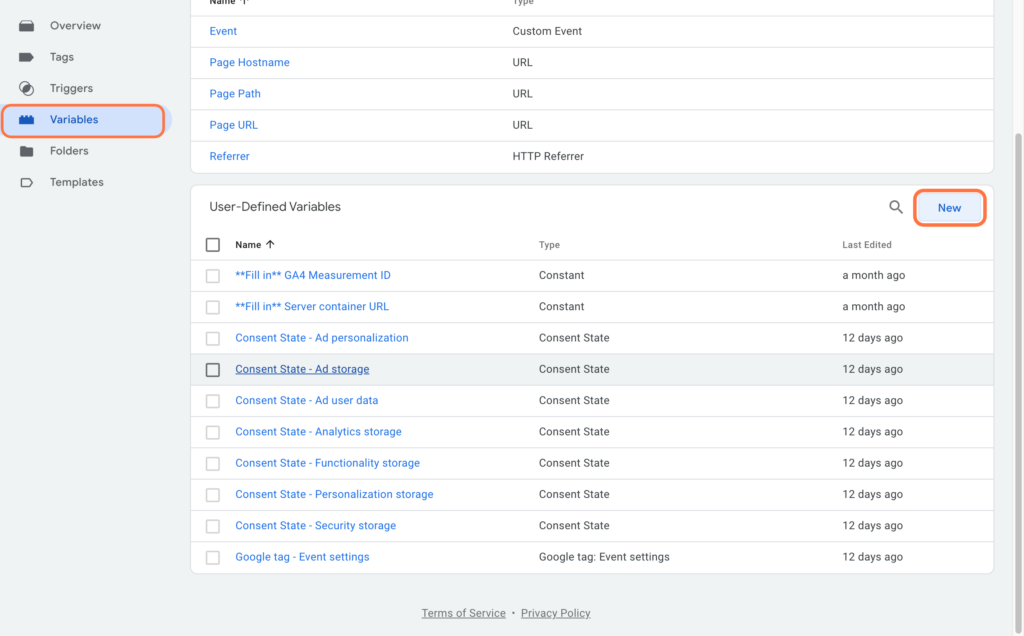
We are now going to create a separate variable for each consent type you have. Go to Variables and click New. We’re going to do Ad Personalization as the first level of consent. Name the Variable such as Consent State – Ad personalization.
12. Set Consent Variable (Web Container).
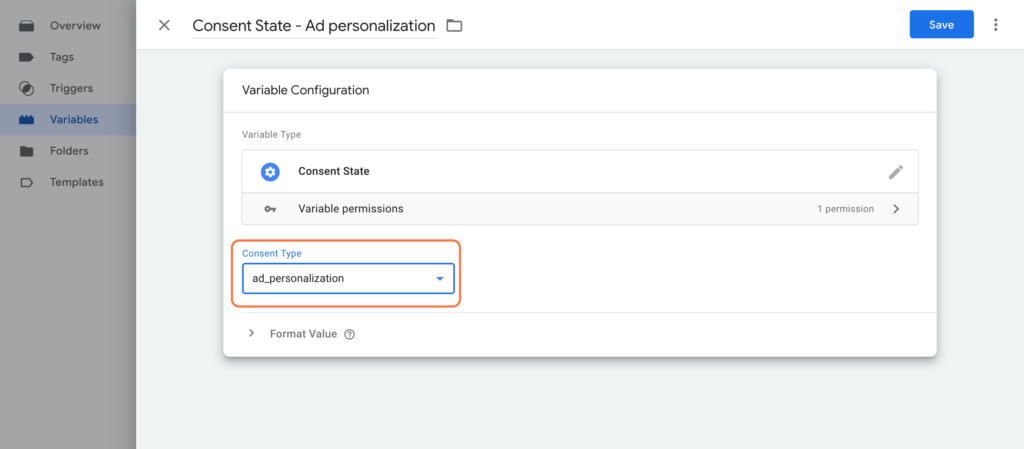
As variable type, we choose Consent State (Templates you just uploaded) . Then under Consent Type here, choose the type in question, in this case ad_personalization. Then click Save.
Then do this for each Consent State.
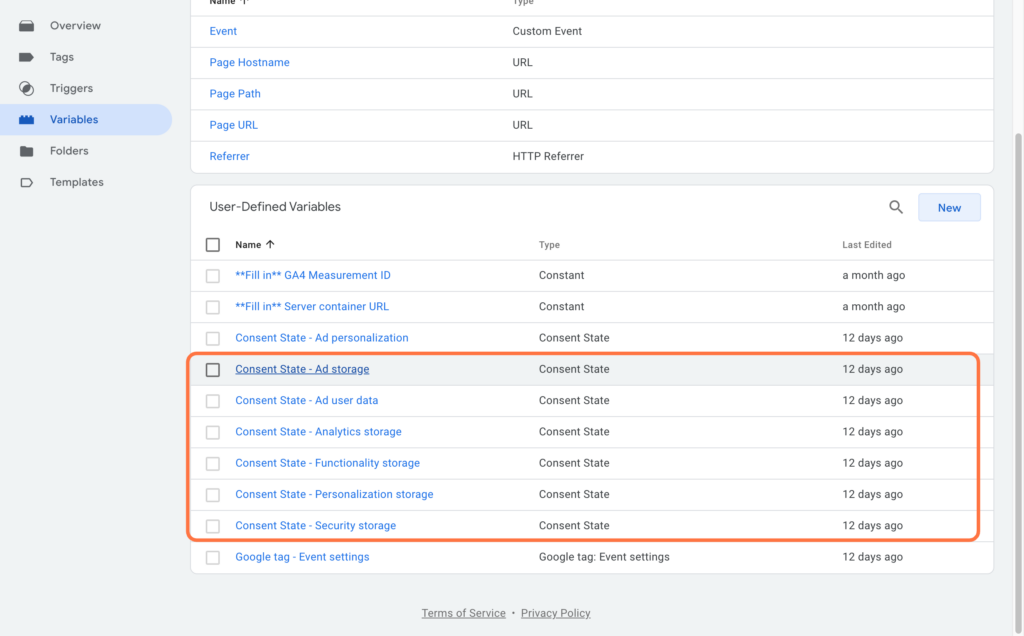
13. Create Event Settings Variables (Web Container).
Now that the Variables per consent have been created we are going to combine them into one Variable. Click new again to create a new variable. Name the Variable, Google tag – Event_name – Settings. Next, choose as Variable Type: Google Tag: Event settings. Next, add all Consent Statuses under Event Parameters.
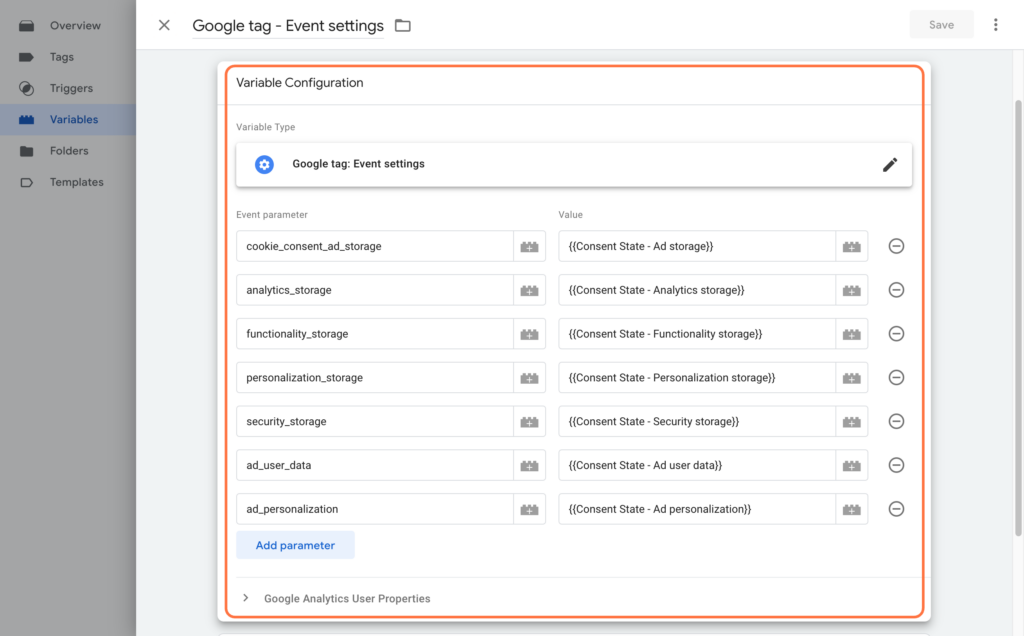
14. Google Tag – Add Event Settings Variables (Web Container).
Now that this Variable is created we are going to add it to the Google Tags. This sends data to the server container per consent level. Go to the Google Tag and then add the Google Tag: Events settings Variable under Event Settings Variable.
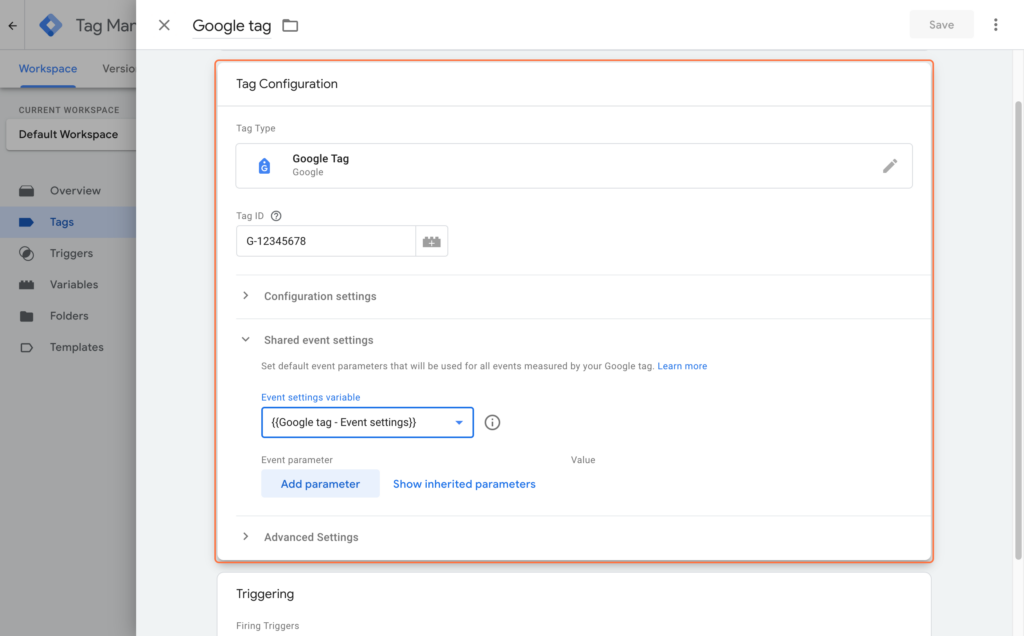
15. Consent Overview (Web Container).
Do you have any tags that are sent from the web container data to third-party companies? Therefore, follow the following steps. This happens when you run both the FB Pixel and the Facebook Conversion API for Facebook, for example. Then you still send data from the web container to Facebook using the Pixel.
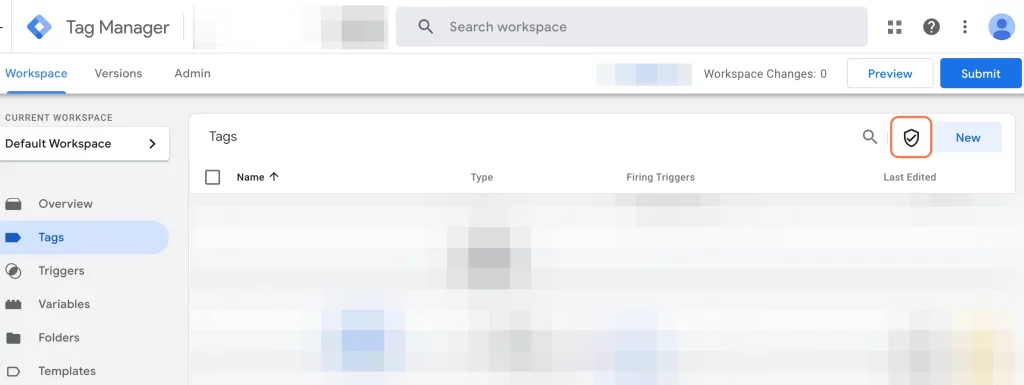
There is built-in consent in many platforms, such as Google Analytics. But this is not true in all platforms, you can check this by going to Tags and clicking on the shield icon.
Under Built-in consent, you will see the Tags that have built-in consent. Some tags do not have this set, such as the Facebook Pixel. You need to add additional consent to these tags. You must do this within your tags.
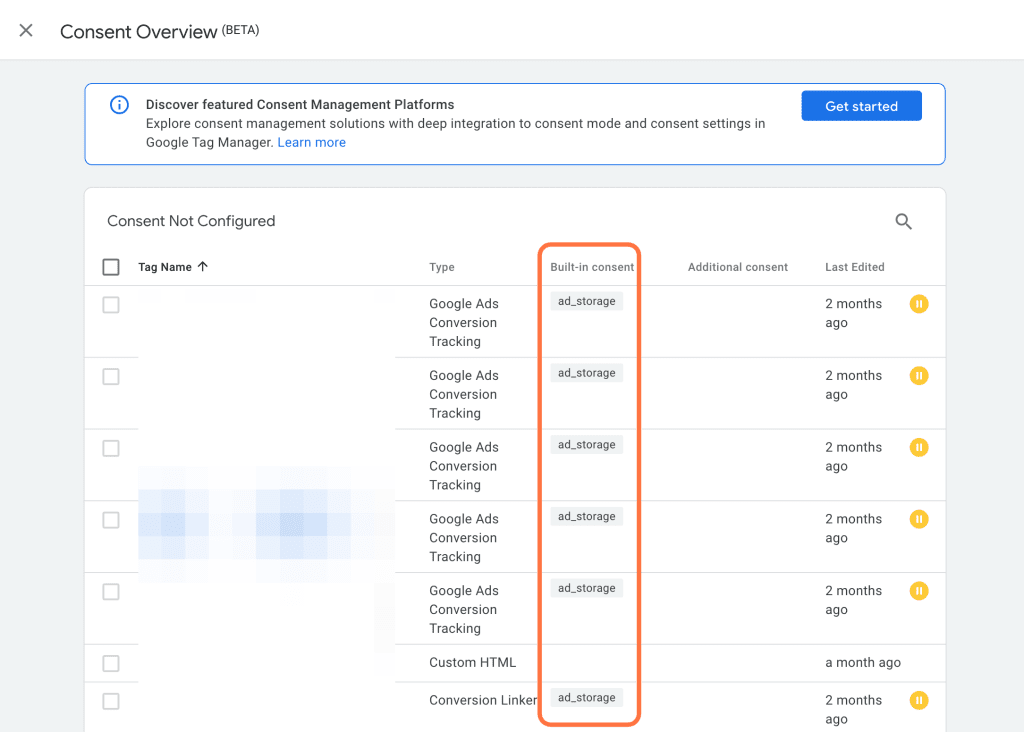
16. Add Consent to tags (Web Container).
Go to the tag where you want to add additional consent and check Require additional consent for tag to fire under Consent settings. The most commonly used (and the ones you often need as the only ones) are ad_storage and analytics_storage. You choose ad_storage when it comes to tags that deal with tracking, for example, ads (ads) and you choose analytics_storage when it comes to tracking statistics, such as google analytics, for example. In the case of the Facebook Pixel, we choose ad_storage.
17. Add Cookie banner to your website (Web Container).
Once you have created the Cookiebot Tag in Google Tag Manager, you need to add another script to your website to make the consent mode work properly. How to do this? Check out this blog.
Set Consent Mode in GTM Server Container (Server Side).
We are going to manually add Consent Mode in server Container. For this we use the various variables including the new V2 consent states. We will send these along with the Google Tag to the Server Container and in the Server Container we will use variables added to triggers to ensure that tags are sent at the appropriate consent level.
Note! For all Google products (Google Ads, GA4 Etc. ), you do not need to add additional settings in the Server Container. So you only need to set up the Google products in the web container.
The permission banner collects user choices and sends them to the server via the Google tag and permission parameters in an HTTP request, then Google product tags adjust the data types and amounts sent based on user preferences.

For all other platforms such as Facebook, you can follow these steps.
1. Create Variables for each consent state (Server Container).
The data enters the Server Container from the Web container by creating new Variables. You need to do this for the consent states how they are sent to the server container.
We show this in an example for the consent state: ad_personalization.
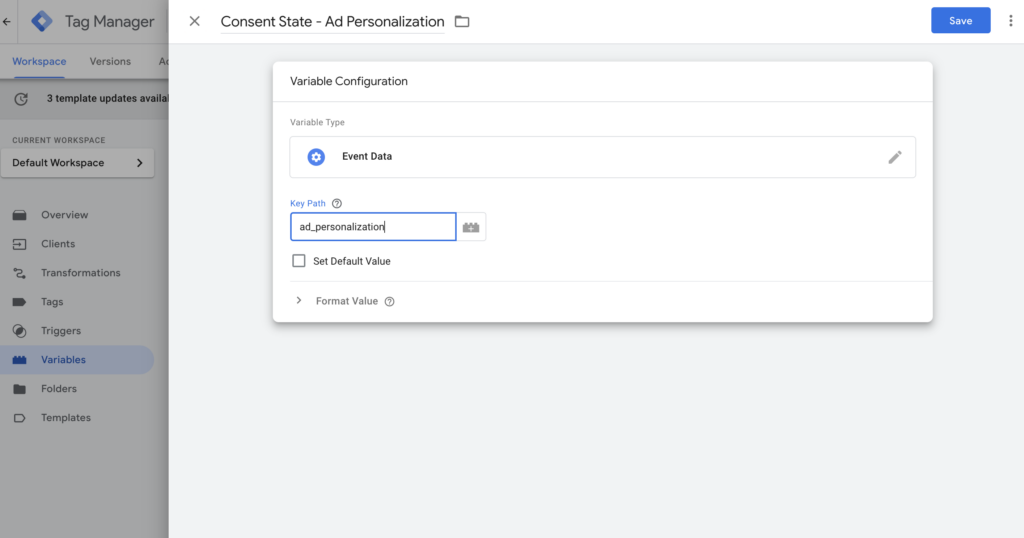
Go to the server container and create a new variable. Call this Consent State – Ad Personalization. Choose Event Data as Variable Configuration. Then fill in ad_personalization as Key Path because that is how it is sent from the web container to the server container. Then click Save.
2. Add Consent States Variables to required tag (Server Container).
You can add the Variables from Consent States to the tag you need. Before using Certain Tags, it is important that marketing has been accepted by the user. If not, the tag should not be activated.
You can do this by adding the Consent State – Marketing to the relevant Tags. Adding the newly created variable as a condition to the trigger will fire the Facebook Conversion API only when marketing cookies are accepted by the user. You can do that by doing the following:
This tells you that the Tags should be fired only when marketing cookies have been authorized. This is consistent with enforcement of the Digital Markets Act (DMA).
You can then add these back to your tags. You then do this again based on when certain consent states are not checked that you are then not allowed to fire the tags.
Note! You need to create different GA4 Client Triggers for the different consent states.
To which tag should I add which consent?
Now comes the tricky part. You must determine for each event under which consent it falls. As mentioned earlier, in the Server Container with Google products, you do not need to make any additional settings in the server container. As for the rest, you need to think about which consent state a tag falls under. for example, a Purchase in GA4 falls under statistics because you use it for statistics and not for marketing purposes. So then you need to make sure that the purchase trigger is set so that the statistics cookies have been accepted by the visitor .
How to move forward?
Consent mode is a good initiative by Google to make complying with privacy guidelines more accessible. It helps marketers and developers comply more easily. However, as we move away from browser tracking and increasingly use server side tracking, it is important to also build a built-in consent mode into the server container.
For now, using this blog, you will have to set these up yourself. Our expectation is that Google will come up with a server side solution in the foreseeable future. However, it is impossible at this time to predict when this will be. Need help or want to check the setup? If so, please contact us.
Consent Mode V2 FAQ
Why Should I Implement Google Consent Mode v2 for Improved Online Marketing?
To remain competitive in digital advertising within Europe, it is essential to adopt Google Consent Mode v2. This update, effective from March 2024 in line with the Digital Markets Act (DMA), is important for GDPR compliance and access to the European market. Google products such as Google Ads are integral to advertising strategies and user engagement; non-compliance could mean losing a significant European user base.
What is the Deadline for Implementing Google Consent Mode v2?
The transition to Google Consent Mode v2 must be completed by March 2024. This is in line with enforcement of the Digital Markets Act (DMA), a crucial step in data protection and user privacy within the European Economic Area (EEA). Failure to comply will limit access to Google’s advertising tools, affecting remarketing and user acquisition from Europe.
What Happens If a Website Has Not Implemented Consent Mode?
Neglecting the implementation of Google Consent Mode v2 before March 2024 will result in the restriction to use some Google Advertisement products, impacting remarketing capabilities in Google Ads, Floodlight, and Display. This can significantly reduce analysis of Web site performance and effectiveness of ad campaigns.
What is the Role of the Two New Parameters of Google Consent Mode v2?
The introduction of ad_user_data and ad_personalization in Google Consent Mode V2 marks a significant advance in user privacy and ad customization. These parameters provide user consent regarding data use for advertising and personalized marketing.
What is the Difference between Basic and Advanced Consent Mode?
The advanced Consent Mode in Google Consent Mode v2 enables initial cookie-free data collection focused on user privacy while still collecting essential insights. Unlike the basic consent mode, the collection of user data is completely waived until consent is granted. Both modes offer different approaches to data protection and ad efficiency.
Does the deadline of setting Consent Mode V2 for March only apply to Europe?
Compliance with the March 2024 deadline specifically targets organizations operating in or offering services to users in Europe.
Is Consent Mode only for Google Tag Manager?
Consent Mode is not a feature of Google Tag Manager. It is a feature of the overall Google Tag ecosystem and is Administered by the Google Tag Library. Google Tag Manager provides tools and utilities that make it easy to interact with Consent Mode, but it does nothing more than what Consent Mode already naturally does.
For which tags is Consent Mode relevant?
Consent Mode is generally focused on tags within the Google universe, such as Google Analytics, Google Ads and Floodlight, as well as Conversion Linker-tag type tags. Other tags could also theoretically be Administered with Google’s additional general flags for “personalization, security and functionality. There is an important difference, though: these settings are for tag display only and do not affect behavior, as with Google Tags regarding cookie use. An exception to this rule is Microsoft Ads, which also has a consent mode, but it must be initialized and used in a similar way, does not live in the datLayer and is completely independent of Google Consent Mode.
What should I do if my CMP does not support the new consent modes?
If you are using a CMP (Consent Management Platform) that does not support consent mode, you can include initialization in your own configuration. This initialization can be added via JavaScript directly on the page or as an HTML tag via the Tag manager. If you use Google Tag Manager (GTM), you can also do this using Simo Ahava’s tag template. As an HTML tag, executed as early as possible when permission is granted (possibly as a setup tag for Google tag or Google Ads Tag conversions, etc.), it can look like this when manually configured:
<script>

venster.dataLayer = venster.dataLayer || [];

function gtag(){dataLayer.push(argumenten);}

gtag('toestemming', 'default', {

'ad_storage': 'toegekend',

'analytics_storage': 'toegekend',

'ad_user_data': 'toegekend',

'ad_personalization ': 'toegekend',

'wait_for_update': 500

});

</script>
About the author

Ate Keurentjes
Server Side Tracking Specialist at TAGGRS
Ate Keurentjes is a Server Side Tracking specialist at TAGGRS. He has experience with various Google Tag Manager concepts. Keurentjes has been editing and writing about the latest developments and trends in data collection / Server side tracking since 2023.