Advertisers are constantly looking for ways to measure and improve the effectiveness of their campaigns. With the emergence of Profit Tracking, marketers have a new weapon in their arsenal. This insightful measurement tool extends beyond the traditional ROAS (Return On Ad Spend) by looking not only at revenue, but also at the profit generated by each euro invested. This blog takes you on a journey through the world of profit tracking, from the basics to advanced implementation with Google Tag Manager (GTM) and Firestore.
Key points 🔑
- Profit tracking is an advanced metric that measures both revenue and profit generated from ad spend, for a more complete picture of its contribution to operating profit.
- Unlike ROAS, which focuses on revenue, profit tracking takes profitability into account by including costs such as COGS and operating expenses.
- By implementing and testing profit tracking, advertisers can better align their advertising strategies with profitability rather than just revenue, which can lead to more financially sustainable ad campaigns.
Table of Contents
What is Profit Tracking?
Profit Tracking, is an advanced metric that goes beyond ROAS by measuring not only revenue generated from ad spend, but also profit. It provides a clearer picture of the actual contribution of ad spending to corporate profits and enables advertisers to make more informed decisions about their advertising strategy.
Replacement for Purchase Event
Profit Tracking is a replacement for the purchase value you normally attach in Google Tag Manager. Instead of revenue, which is what you use for ROAS, you now send along profit.
Calculation profit tracking = (Conversion value – Purchase & selling costs) / costs
Profit Tracking Example
Background: An e-commerce company specializing in durable outdoor apparel is looking to optimize their ad spend to increase profitability.
Challenge: The company is having success with their current ad campaigns on various digital platforms, but is struggling to accurately measure the actual profit that each ad dollar generates. The current focus is on revenue, with no direct link to net profit after costs and expenses.
Solution: By implementing Profit Tracking, the business can gain a deeper understanding of the actual profitability of their advertising efforts. They do this by including not only revenue but also cost of goods (COGS), operational costs, and platform-specific advertising costs in their calculations.
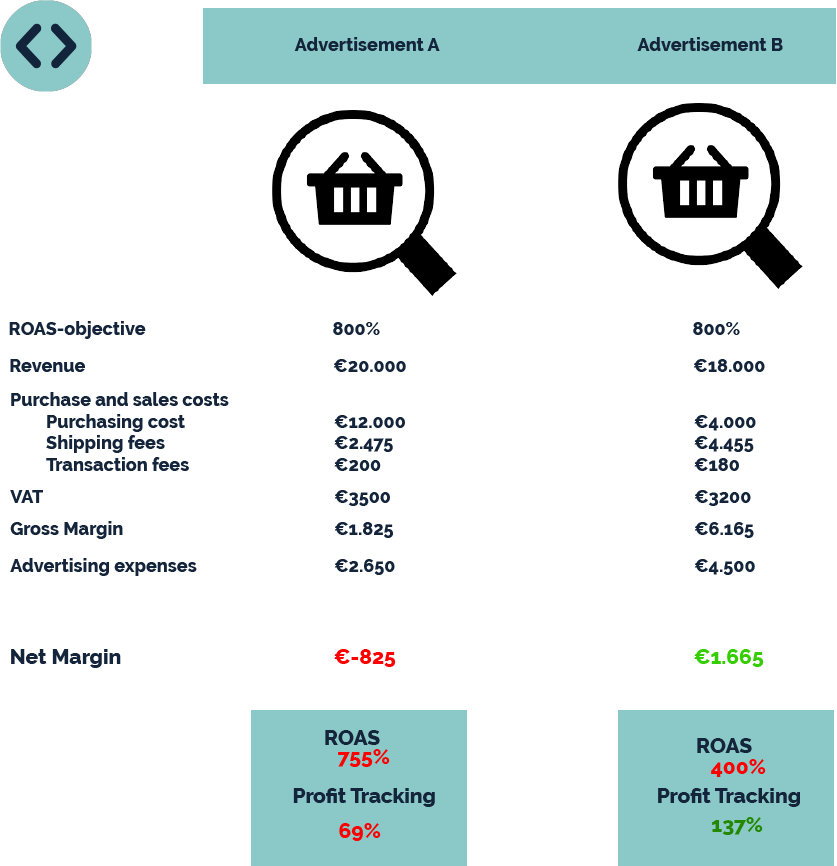
But it’s all about ROAS, right?
ROAS (Return On Ad Spend) has long been the standard KPI (Key Performance Indicator) for many advertisers. However, focusing on gross sales without considering actual profitability can be misleading. It often leads to a distorted picture of the effectiveness of ad spending because it does not take into account costs outside of direct advertising costs, such as product costs, overhead, and other operational expenses.
ROAS vs Profit Tracking: who wins?
Profit Tracking is a better metric because it helps advertisers focus on profitability and not just revenue. It encourages deeper analysis of cost structure and pricing strategies, allowing for better management of the net results of advertising campaigns. This makes Profit on ad spend a more holistic approach to measuring the effectiveness of ad spend.
ROAS vs Profit Tracking Comparison Chart
While ROAS and profit tracking offer valuable insights, they focus on different aspects of financial returns. Below is a detailed comparison table that highlights the key features of each of these metrics.
| Aspect | ROAS | Profit Tracking |
|---|---|---|
| Definition | Return on Advertising Spend | Profit Tracking |
| Focus | Revenue generated per euro spent on ads | Profit generated per euro spent on ads |
| Calculation | Revenue from ad / Cost of ad x 100% | Gross profit margin / cost |
| Example | €4000 revenue / €1000 cost = 4:1 ROAS | €250 profit / €200 cost = 1.25 Profit Tracking |
| Restrictions | Does not take into account company size, reselling or product differentiation | More complex in calculation, requires understanding of profit margins |
Profit Tracking set up using GTM and Firestore
In this tutorial, we will show you how to achieve a detailed tracking setup with Google Tag Manager and Firestore.
What you must have set up beforehand:
- TAGGRS account
- Data layer
- Web container GA4 set including Purchase Event
- Set Server Container
Profit margins are not visible to visitors, as they are not visible in the data layer.
There are no additional costs associated with profit tracking when you set it up yourself. If you want to use our specialists, only the setup fee is a one-time fee!
1. Create a new project (Google Cloud).
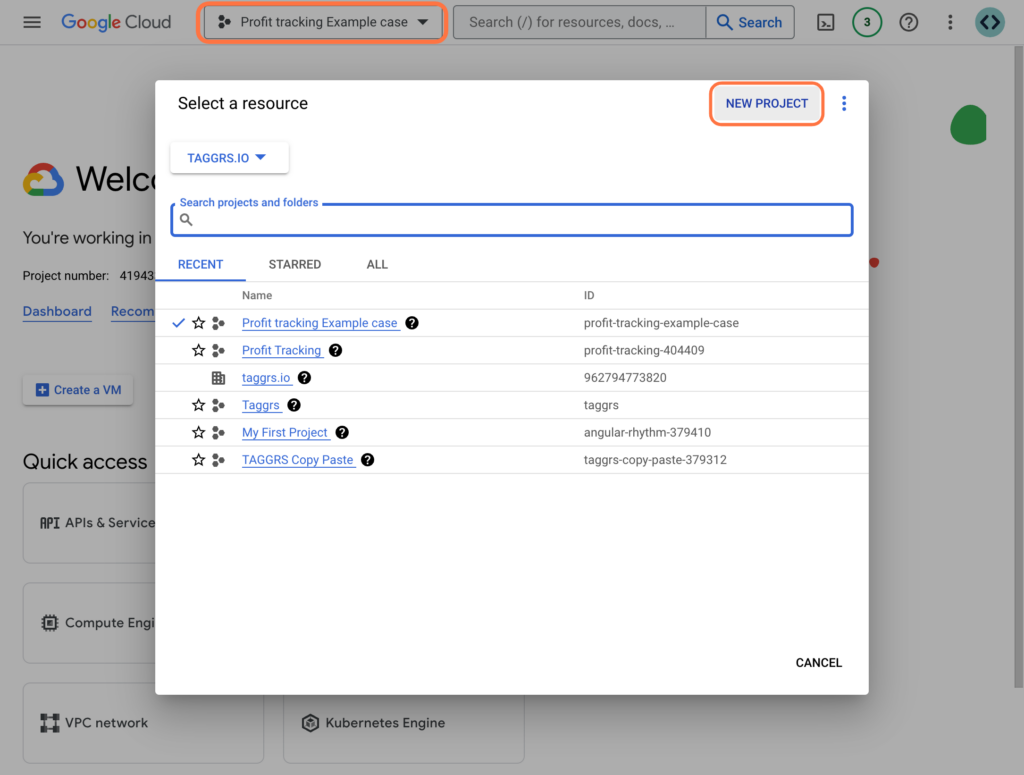
Log in to Google Cloud Console, go to your dashboard and create a new project.
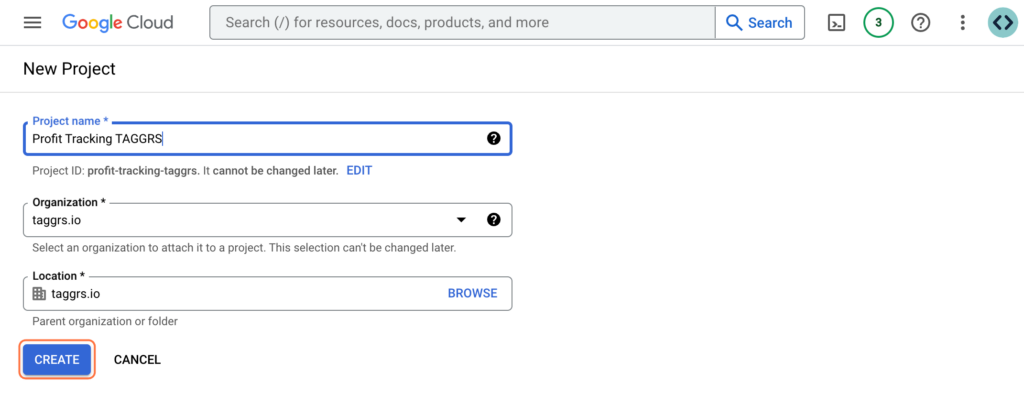
Give the project a name, for example, Profit Tracking TAGGRS, and then click Create.
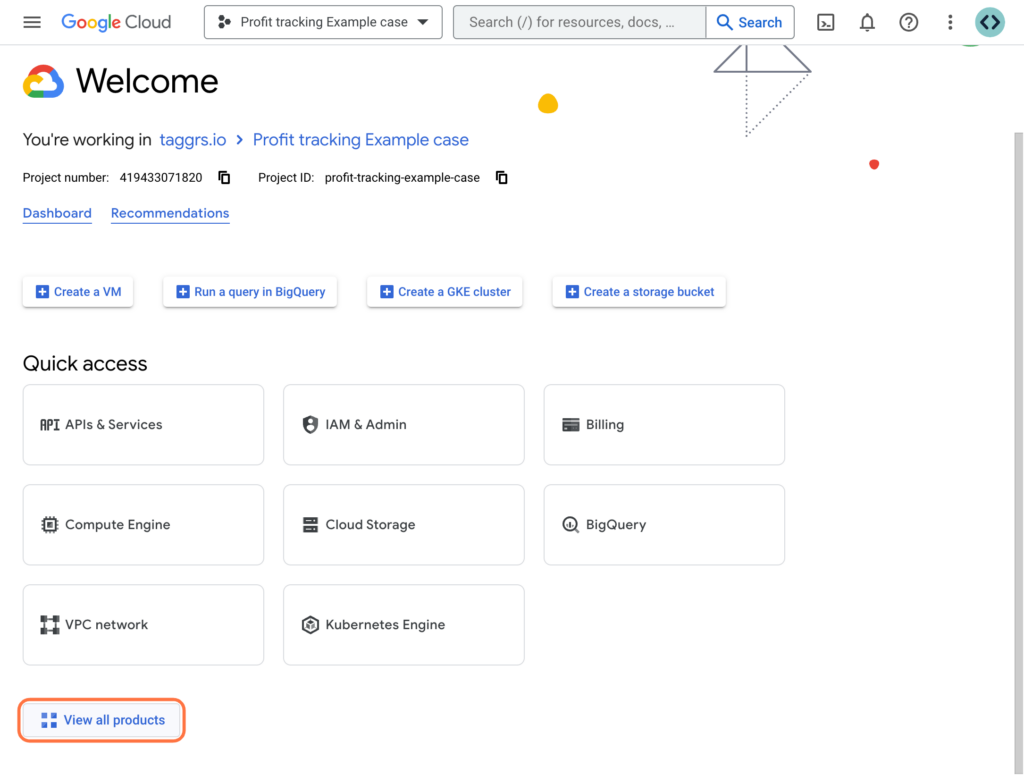
2. Create Firestore (Google Cloud).
Then click View all products at the bottom left and scroll down until you get to Firestore. Then click here.
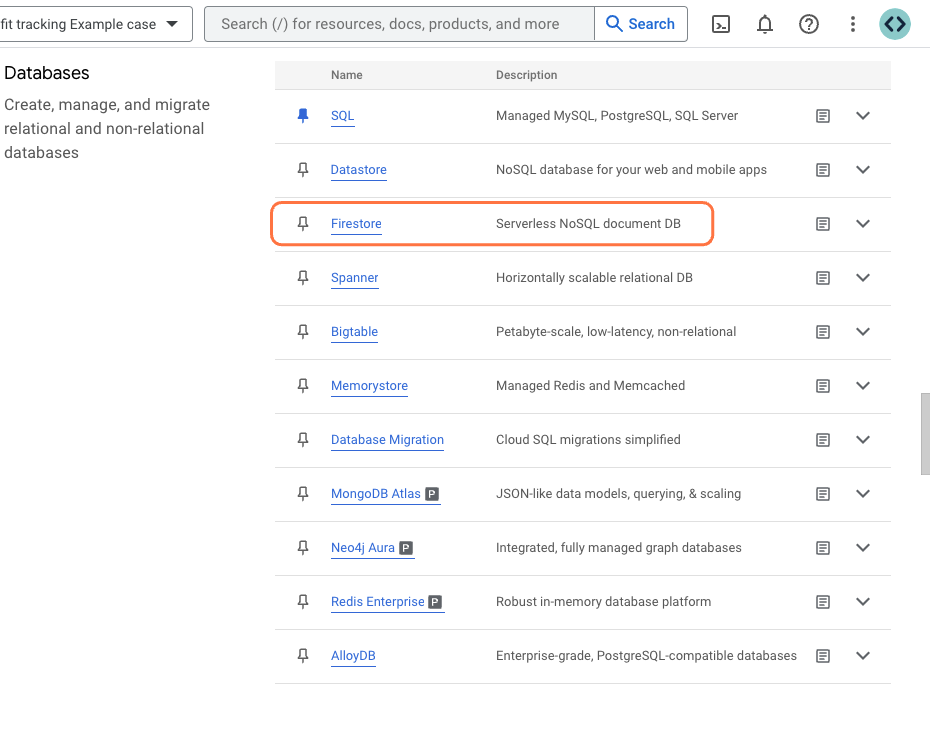
3. Database creation Firestore (Google Cloud).
We are now going to create a database. Click Create Database. Next, choose Native Mode. Then select the nearest location and click Create Database.
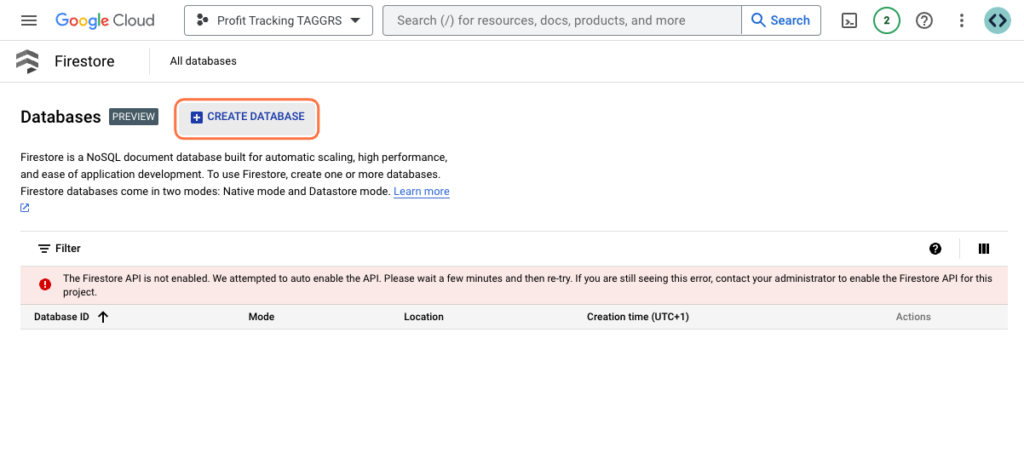
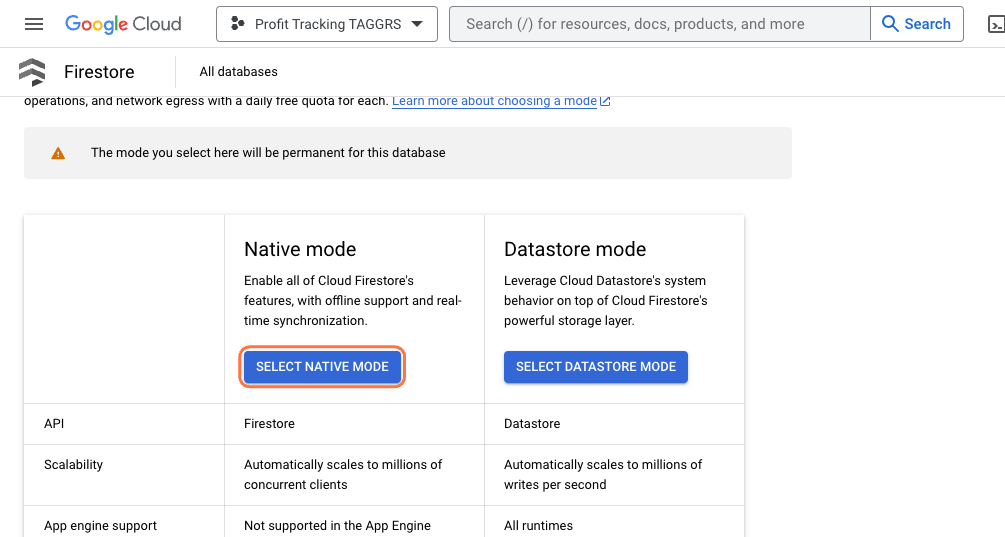
4. Collection creation Firestore (Google Cloud).
Next, we are going to create a collection by clicking on START COLLECTION.
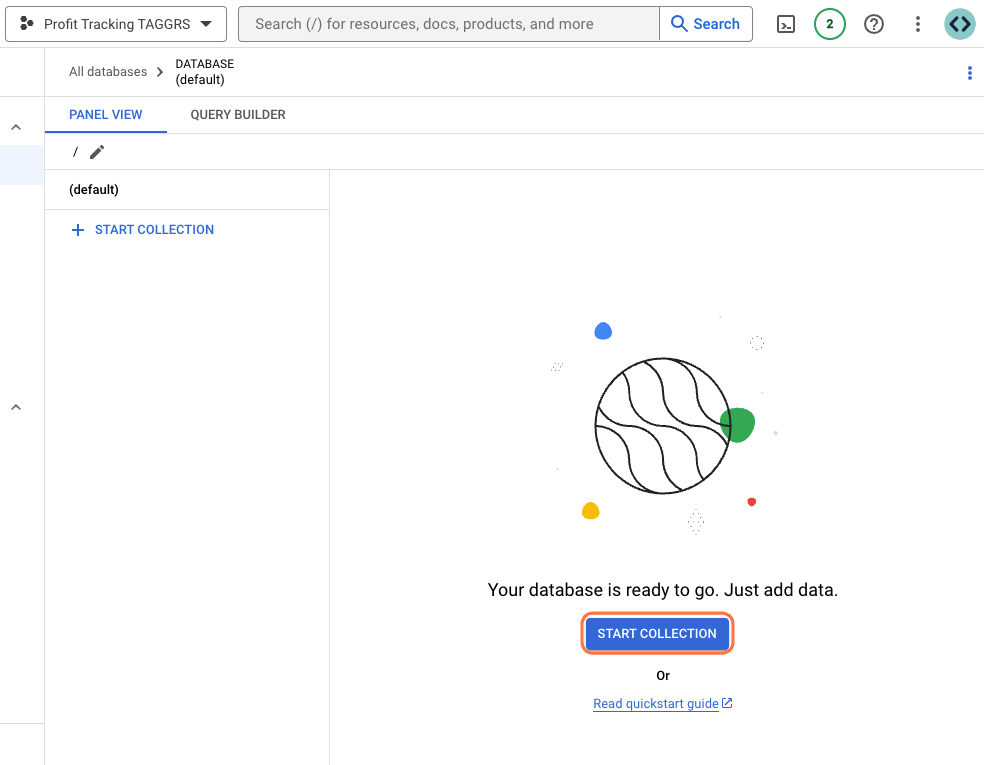
5. Collection setup Firestore (Google Cloud).
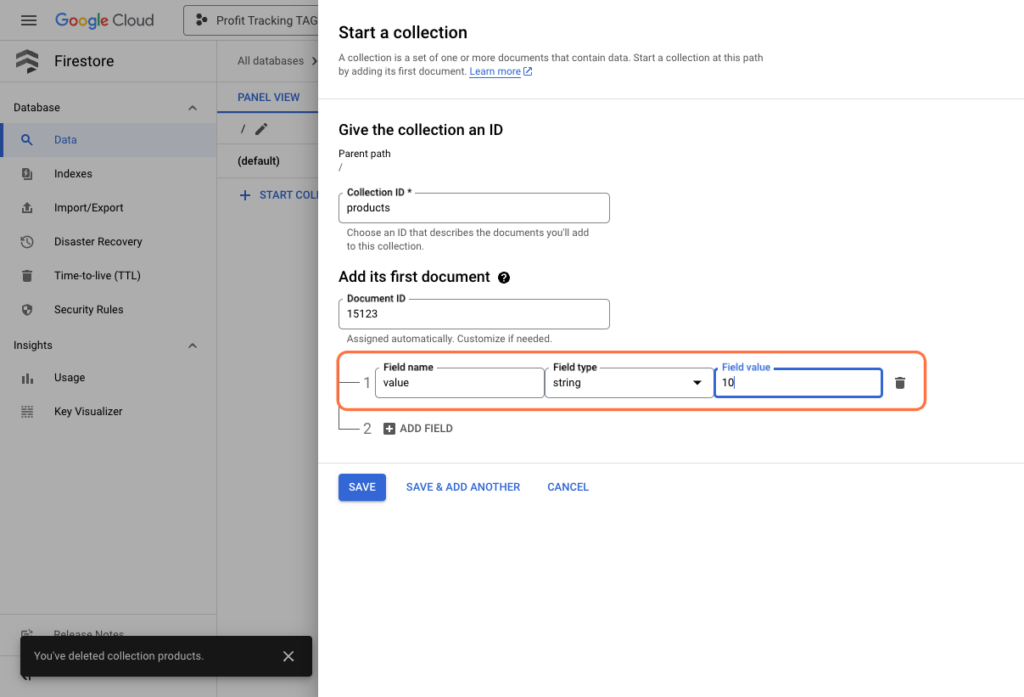
Next, enter the Collection ID. Since they are products, we choose products. Next we need to enter the Document ID fill in the item ID of your product here. In this case, we use 15123 as an example.
Then enter the following:
- Field name: value
- Field type: string
- Field value: profit
As an example, we use a profit of 10 per product, the currency in which this is stated depends on how you have set this in Google Tag Manager. Then do this for all products. Then click Save to save the collection.
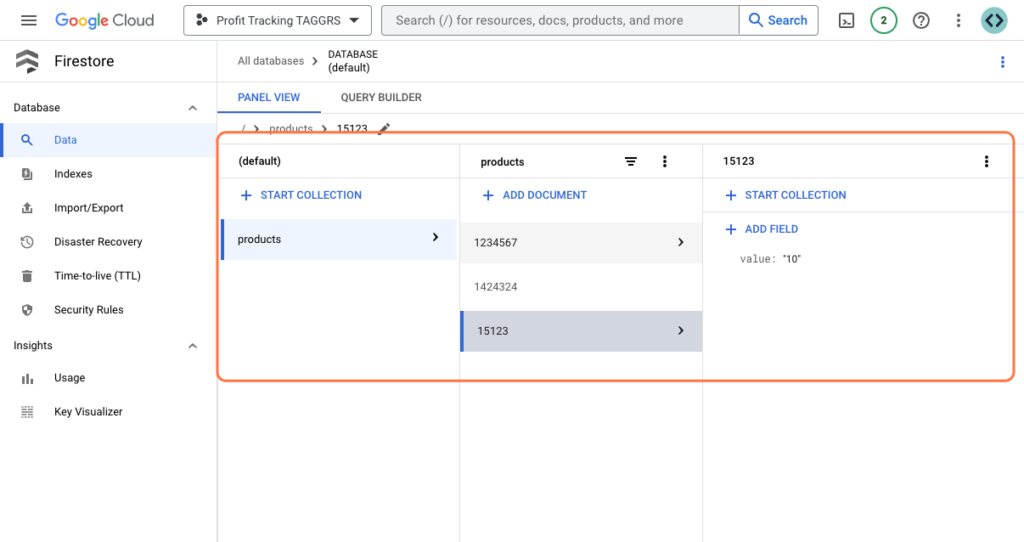
Then you get an overview where you can see the collection, the items’ item IDs and the profit per product.
6. Cloud Console Private Key creation (Google Cloud).
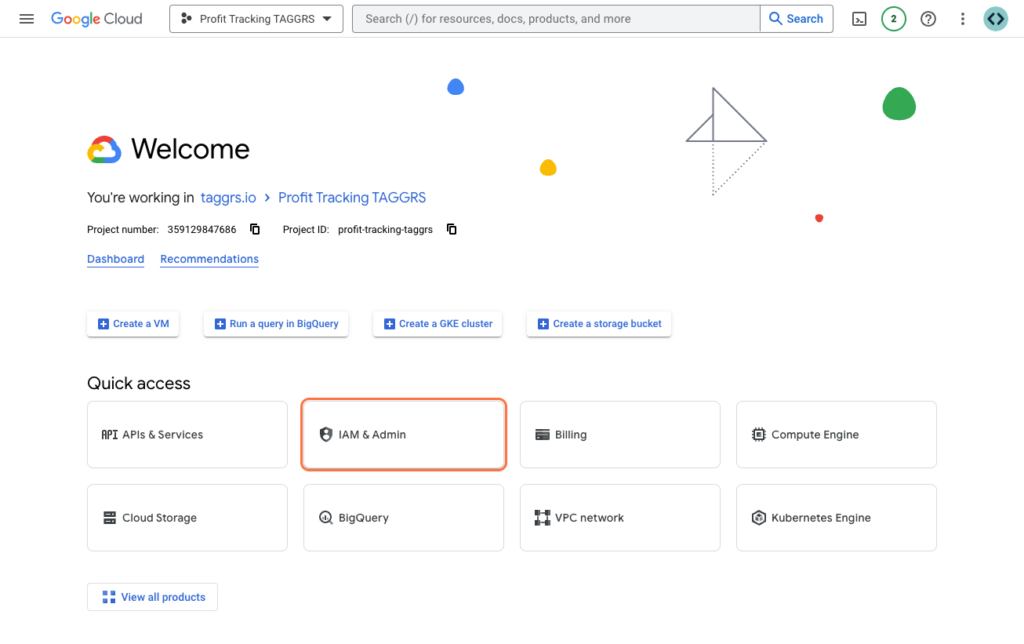
When Firestore is set up, we need to start linking it together with TAGGRS so that the data is linked to the relevant platform. Within your project, go to IAM & Admin.
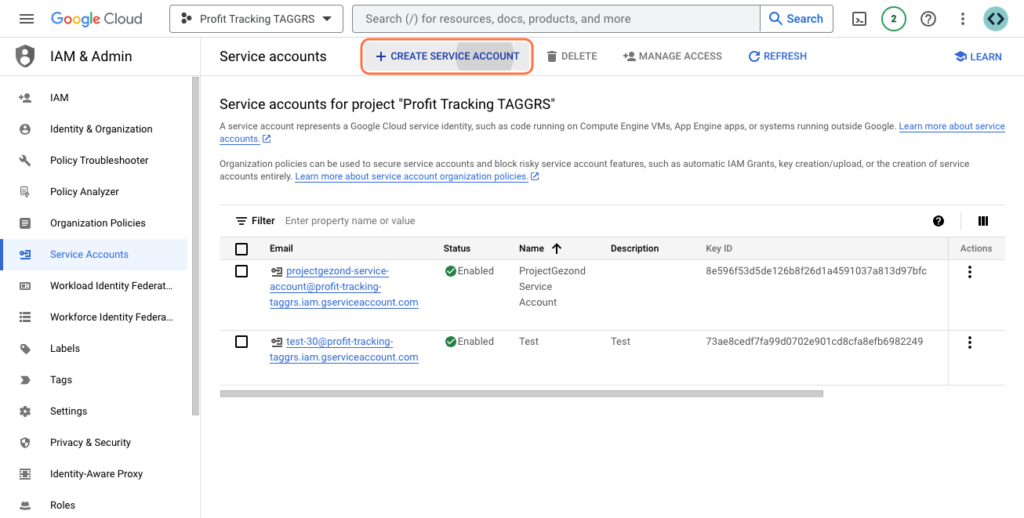
Then go to Service Accounts and click on Create service account. Then enter your desired information here. The Service account name is required, the following steps are optional.
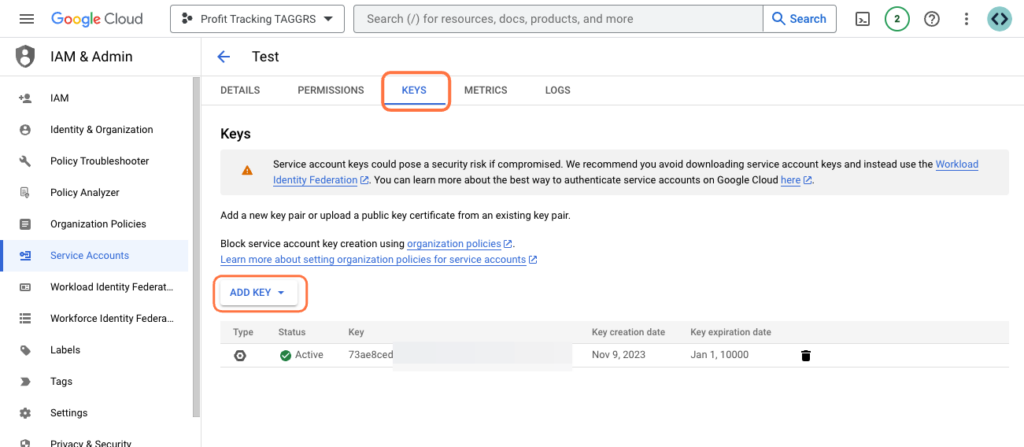
Then click on your created service account. And at the top of the menu, choose KEYS. Next, click on ADD KEY.
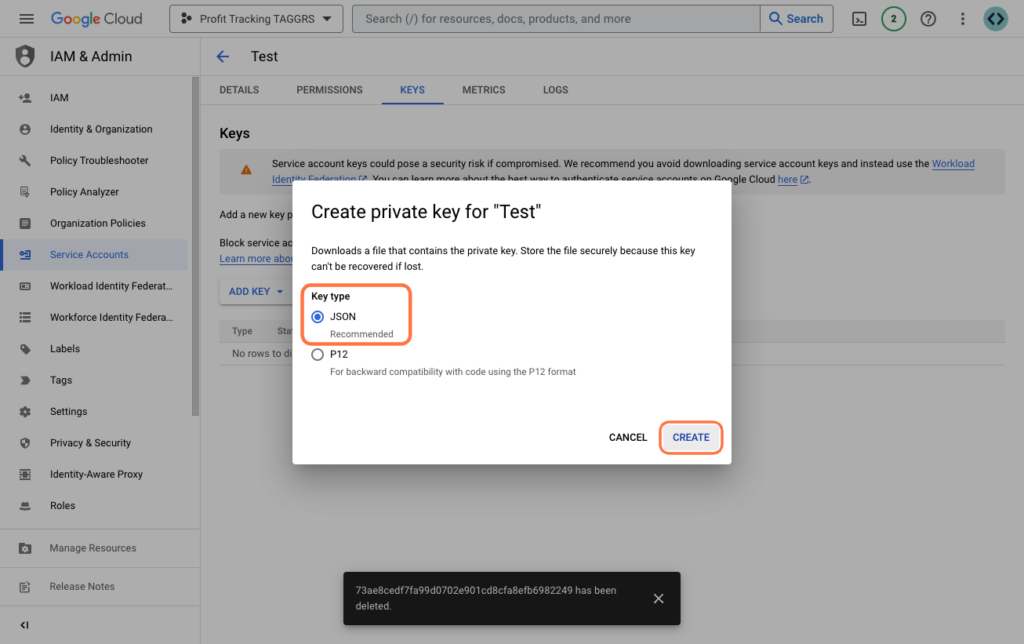
We are going to create the Key next. Choose JSON, and click CREATE. A file is then downloaded.
7. Add Cloud Console Private Key to dashboard (TAGGRS).
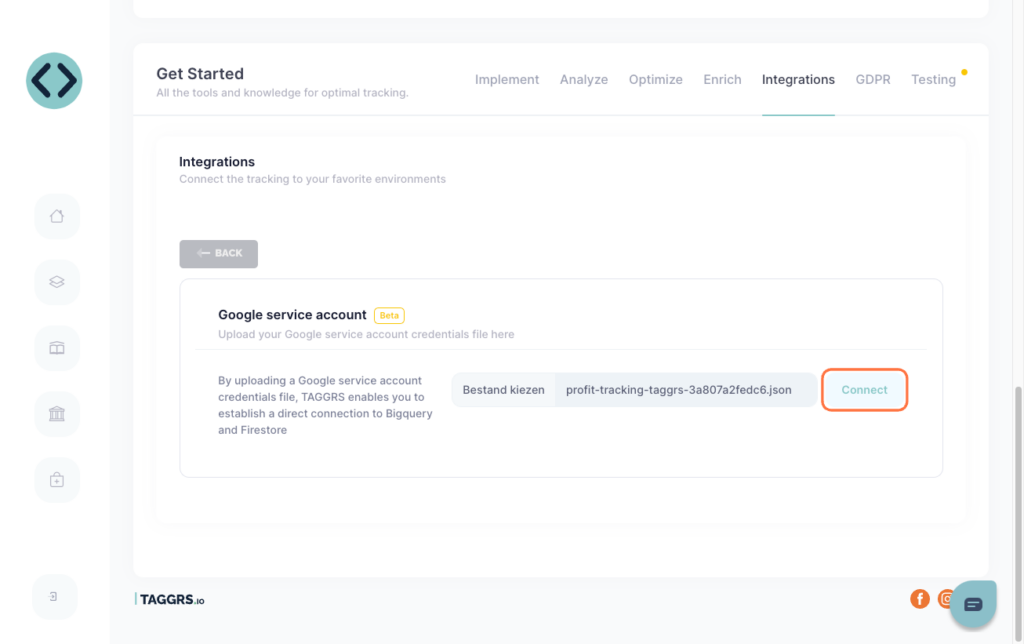
Within your TAGGRS Dashboard, go to Integrations –> Google Service Account. Then upload your JSON file and click Connect. Now Google Cloud Firestore is connected to TAGGRS and you can immediately start importing and analyzing your Firestore data.
8. Insert template in Google Tag Manager (Server Container).
The work in Firestore and TAGGRS is done, we now move to the Google Tag Manager Server Container. Go to Templates and then click on New at Variable Templates.
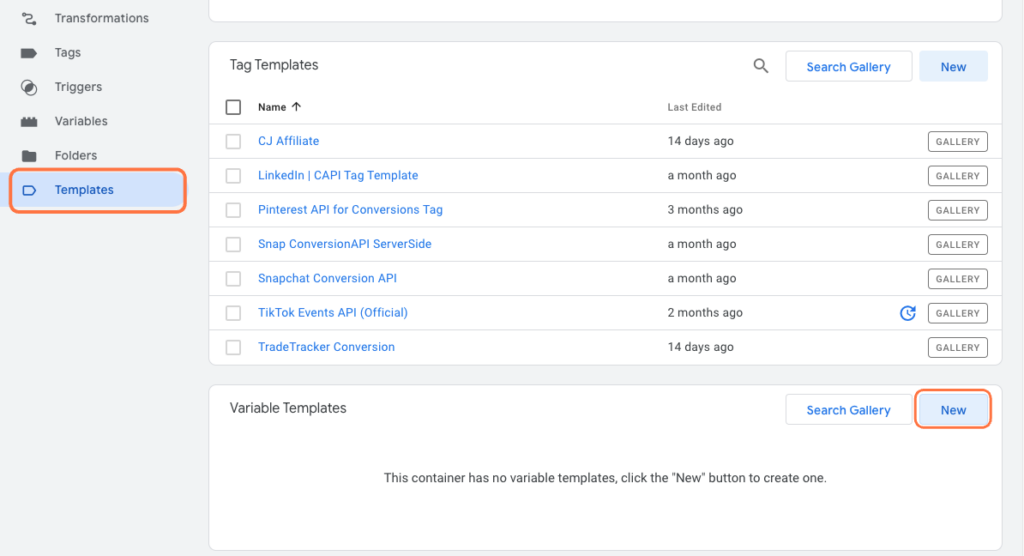
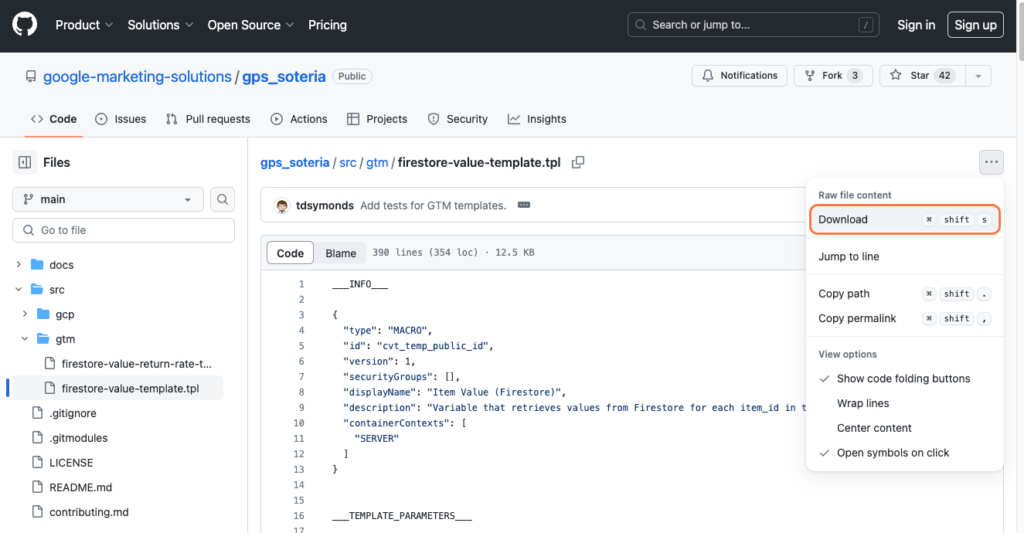
Then click on the 3 dots at the top right and click Import. Here we are going to import a template from Github. Within the Github Template, click on the 3 dots and then click Download.
9. Set up template in Google Tag Manager (Server Container).
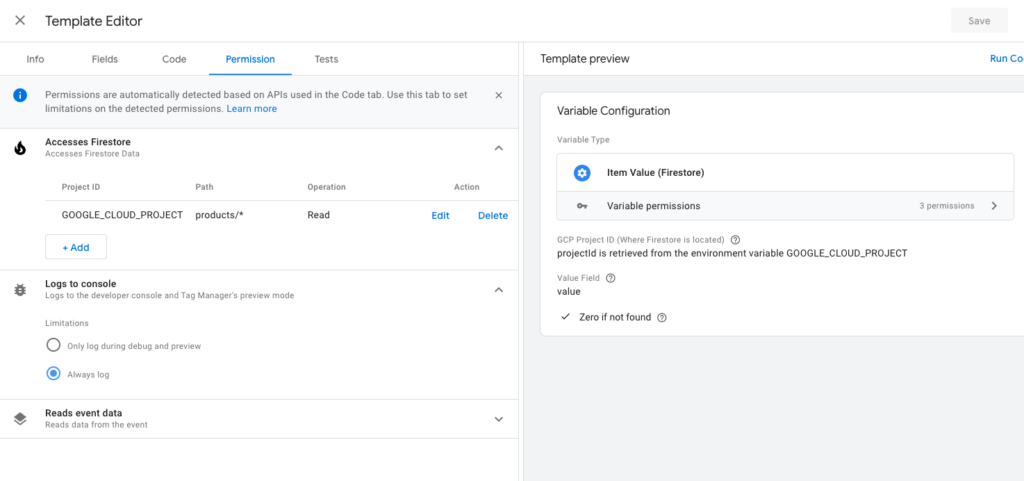
Once you have downloaded the template, we need to check one more thing. The Path at Permission in template must be same the Collection ID within Firebase (step 7). We use Products in this case. Check if this is the same thing.
10. Create new Variable for Profit Tracking (Server Container).
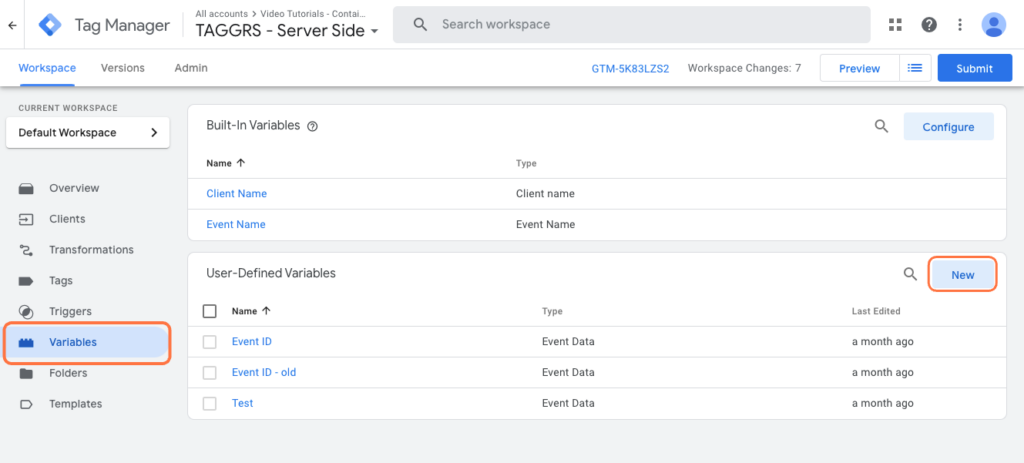
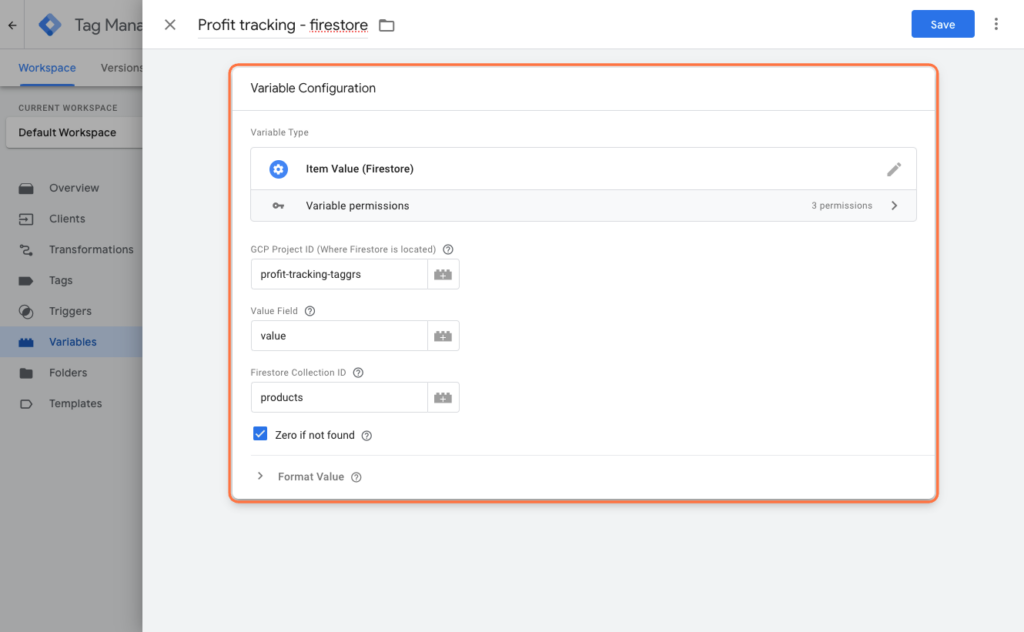
We now need to create a new variable for Profit Tracking in Google Tag Manager. Within the Server Container, go to the Variables section and click on New. This starts the process of defining a name that represents specific earnings data dates, which you can then use in your tags and triggers. Give the tag a name, for example Profit tracking – firestore.
11. Variable Configuration (Server Container).
Click on Variable Configuration. As Variable Type, choose Item Value from Firestore (Custom Template you just added).

12. GCP Project ID Add Variable (Server Container).
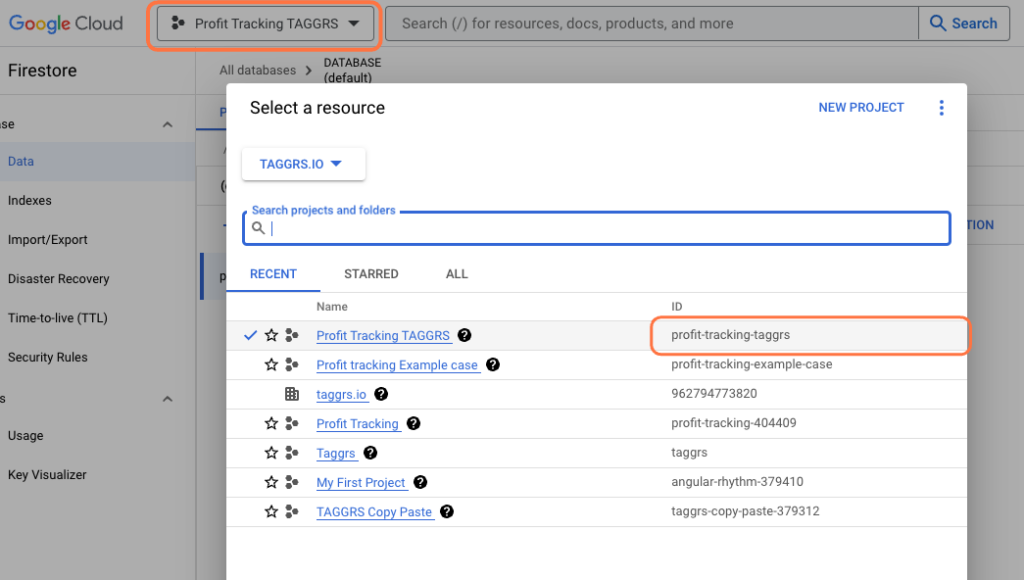
Next you need to add the GCP Project ID. You can find this within Firestore. Click on your account name at the top next to the search bar and you will then see the project ID.
13. Profit Tracking variable setup (Server Container).
Then you add the same thing to the Value Field that you entered in Firestore as Field Name. In our example we use Value. Under Firestore Collection ID, add the Collection ID that you also used in step 7. In our case this was Products. Then save the variable.
14. Select Google Ads Conversion Tracking Tag (Server Container).
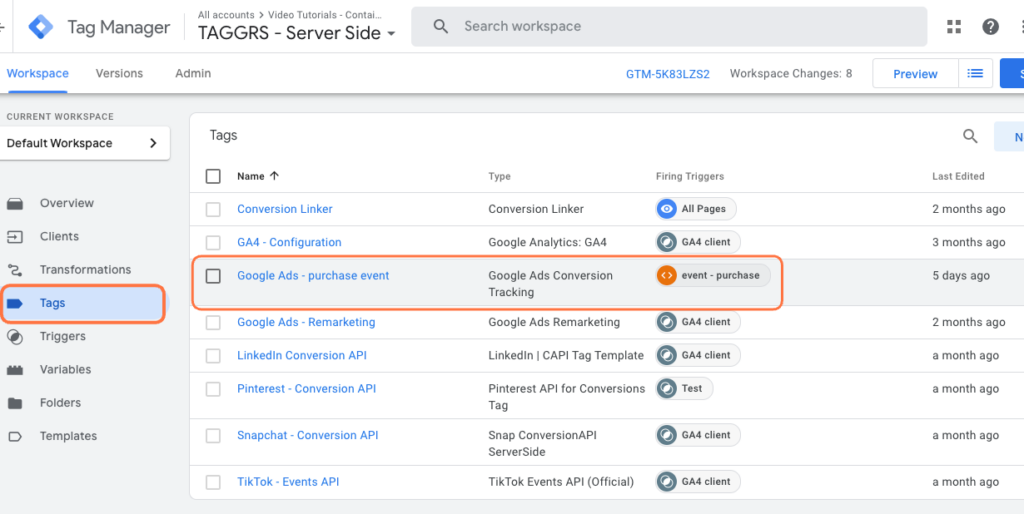
We are next going to add this Profit Tracking Variable to the Google Ads Conversion Tracking Tag and the GA4 Configuration Tag. We begin with the first of the two. Go to the Google Ads Conversion Tracking Tag. Note that it does involve the Conversion Tracking Tag in the Server Container! Don’t have it set up yet ? Then check out this blog.
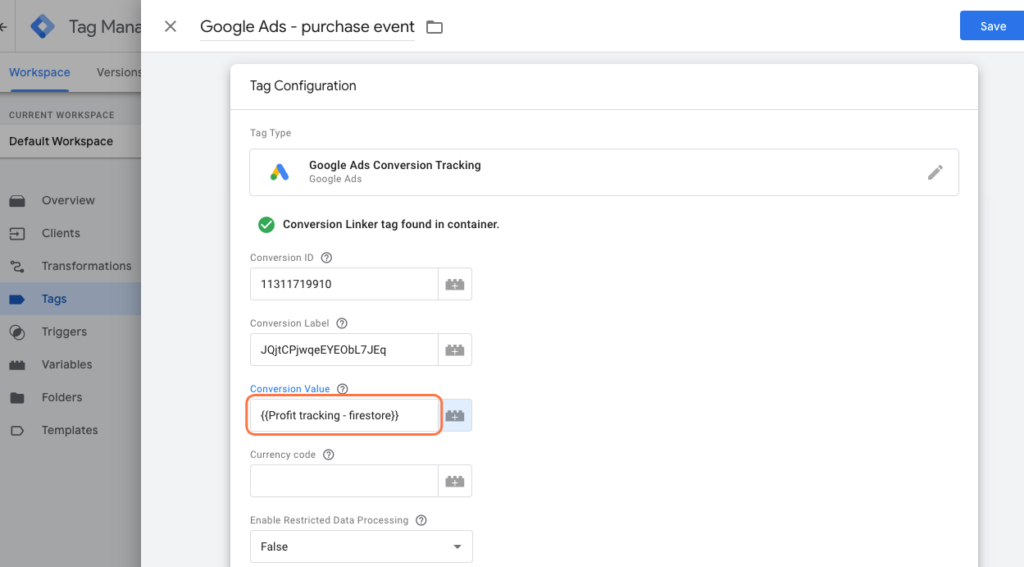
15. Customize Google Ads Conversion Tracking Tag (Server Container).
We need to change the Conversion Value to the Conversion Tag. As Conversion Value you add the variable you just created. Then save the tag.
16. GA4 Configuration Tag Setup (Server Container).
We are also going to add this variable to the GA4 Configuration Tag. Go to the Configuration Tag and under Event Parameters –> Parameters to Add / Edit add the following:
- Name: value
- Value: {{Profit tracking – firestore }}
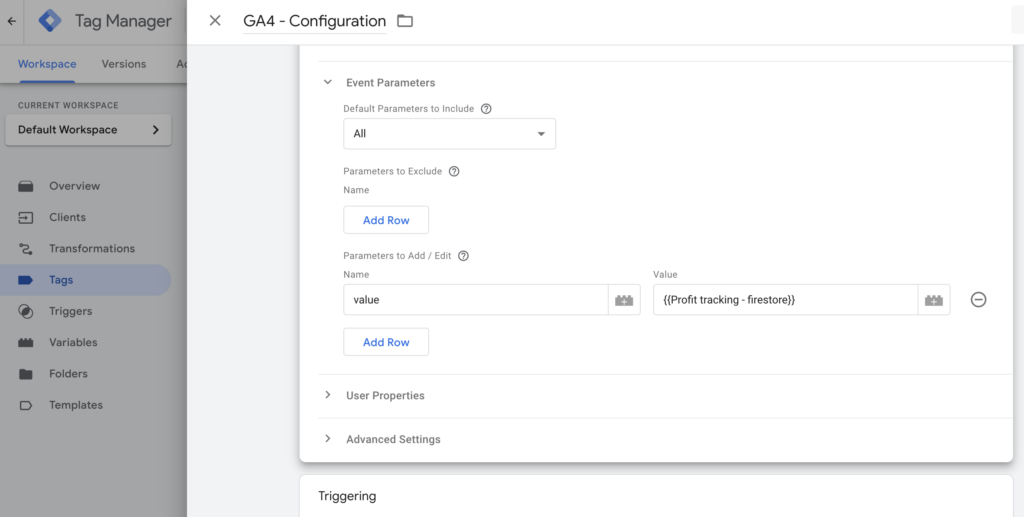
Then save the tag. Then set the container Live and you’ve set up profit on ad spend in Google Tag Manager!
Profit Tracking Testing with Google Tag Manager
Next, we are going to test whether the Profit Tracking settings set up are working. We are going to do this by using preview mode both in the Web Container and in the Server Container. We are going to make a test purchase and then look at the variables to see if the profit is sent along.
Add Custom profit tracking columns in Google Ads
Next, we need to add Custom columns to the Google Ads interface to optimize your campaigns for profitability.
Creating New Columns: Start by opening your Google Ads account. Go to the ‘Campaigns’ tab, select ‘Columns’ followed by ‘Customize Columns’. Here you can add new columns.
Use the following math operators to create the column conditions:
- Profit Tracking = Conversion Value (filter by Conversion Source, select new conversion action) / Advertising Cost
- Net margin = Conversion value (filter by Conversion source, select new conversion action) – Advertising cost
Application and Analysis: After saving the settings, return to “Customize Columns” where you select and apply the new columns. This step allows you to monitor your campaign performance with the Newly created financial metrics.
Conclusion
With the implementation steps from the blog, you are now equipped with the knowledge to effectively configure profit tracking via Google Tag Manager and Firestore. This setup strengthens your ability to understand the true profit of your ad spend. By applying this methodology, you take a big step forward in optimizing your ad budget and achieving a higher return on your ad investments.
FAQ
Do you need Server Side Tracking to get started with Profit Tracking?
Without a server, you can’t connect to Firestore, which is why you need Server Side Tracking to use Profit tracking.