Everything you need to know about the TAGGRS Webhooks Tool
In this article, we explore everything you need to know about how webhooks and how the Webhooks Tool by TAGGRS can simplify and improve your Server-side Tracking. Find out how this TAGGRS tool enables direct data transfer and promotes automation between different platforms.
What are Webhooks?
Webhooks are HTTP requests triggered by specific events, like a payment being completed, and send automatically from one app to another. They are event-driven systems that eliminate the need for constant polling, which involves back-and-forth update requests between apps.
Webhooks automate communication between application programming interfaces (APIs) and can be used to activate workflows. They differ from APIs because the data is directly pushed by the system where the event happens, instead of being requested by the receiving system, enabling faster and more efficient data transfer.
One of their key use cases is Server-side Tracking. Webhooks simplify tracking by ensuring that data about specific events is sent to a tracking server immediately and directly when those events occur, eliminating the need of a client container for the specific event.
How do Webhooks work?
Webhooks are triggered when specific events occurs on your website, CRM, chatbot, or other systems. For example, this could be when someone posts a comment, registers as a new user, or adds a product to a management system. Once an event happens, the server automatically generates an HTTP request and sends it to a predefined URL specified by the customer. This URL is where the webhook receives the event data. As a result, the customer receives the new information immediately, enabling faster responses and improving overall user satisfaction.
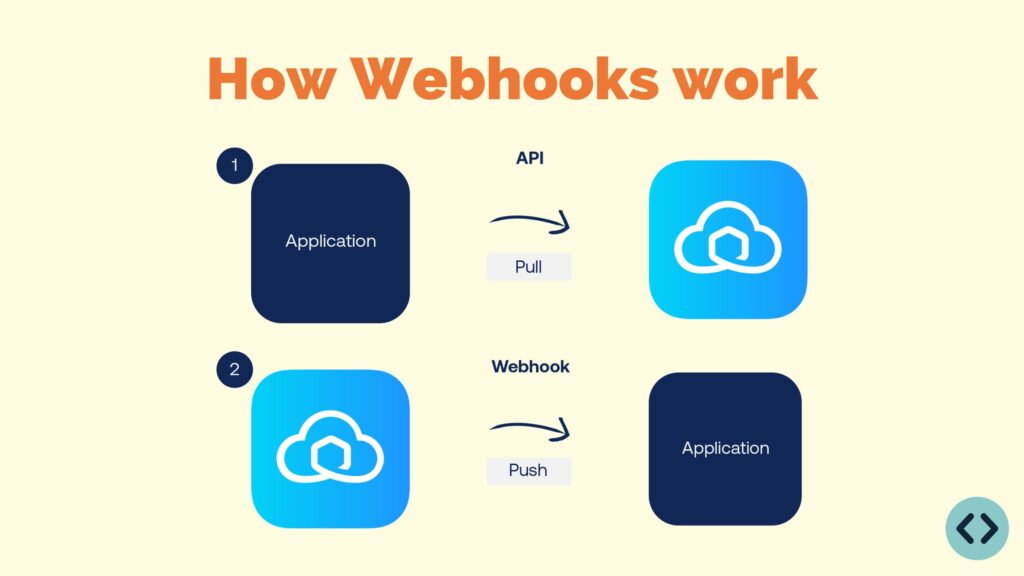
Here is how webhooks work in detail:
1. An event happens in one app, e.g. a user subscribes to your newsletter.
2. Data is sent, the app sends a data message (payload) to a designated URL.
3. The other app at that URL gets the data message and then takes action in real time, e.g. updates the subscriber database.
Webhooks also enable automation by allowing events on one platform to trigger actions on another. For instance, when a customer places an order in an online store, a webhook can notify the owner’s app instantly. This app immediately informs the owner about the new order and sends a confirmation to the customer. This automated workflow reduces manual effort, speeds up processes, and ensures seamless communication between systems.
Benefits of Webhooks for Server-side Tracking
- Real-time data transfer: Webhooks allow data to be sent immediately after an event occurs, leading to near real-time tracking and analysis.
- Reliability: Server-side Tracking with Webhooks is more reliable than Client-side Tracking because it is less dependent on the user's browser environment, which can be affected by ad blockers, network problems, or browser settings.
- Security: Server-side Tracking with Webhooks can be more secure because data is sent directly from server to server, reducing the risk of data loss or interception.
Disadvantages of Webhooks for Server-side Tracking
- Not compatible with all platforms: Depending on how you structure the webhook URL, not every platform is yet compatible with driving and measuring Webhook events. Platforms like Google Ads may have trouble with this. One solution to this is to make the webhook URL as similar as possible to a traditional GA4 request, this way you can ensure that the relevant tags can recognize the necessary parameters such as gclid, ga4 id, etc.
- Requires technical knowledge: Setting up Webhooks requires technical knowledge and is generally more complicated than setting up traditional tracking via the client container.
Example Webhooks for e-commerce stores
Imagine you have an e-commerce store and want to track all purchase activity using an external analytics platform. Webhooks offer a seamless and efficient way to do this. Here’s how the process works:
1. Webhook URL configuration
First, configure your e-commerce platform with the webhook URL you generated. This URL acts as the destination where purchase event data will be sent (typically to your server-side tracking container).
2. Event detection
Each time a customer completes a purchase on your e-commerce platform, the server detects this event in real time.
3. Webhook activation
Once the purchase is completed, the server activates a webhook by sending a request to the configured webhook URL. This request contains important information about the purchase, such as the order number, amount, products purchased, and so on.
4. Processing by the analysis platform
Your Google Tag Manager (GTM) server container receives the webhook data, processes it, and forwards the event details to your connected analytics and marketing platforms.
How do you generate a default webhook URL?
Prerequisites
- Download the TAGGRS Data Client template
Implementation
Below we show you how to create a standard webhook event based on Javascript.
1. Open Webhooks within TAGGRS

The first step is to open the Webhooks Tool within TAGGRS. Within your dashboard, go to Tools and select Webhooks here. Then press the plus sign.
2. Select Event
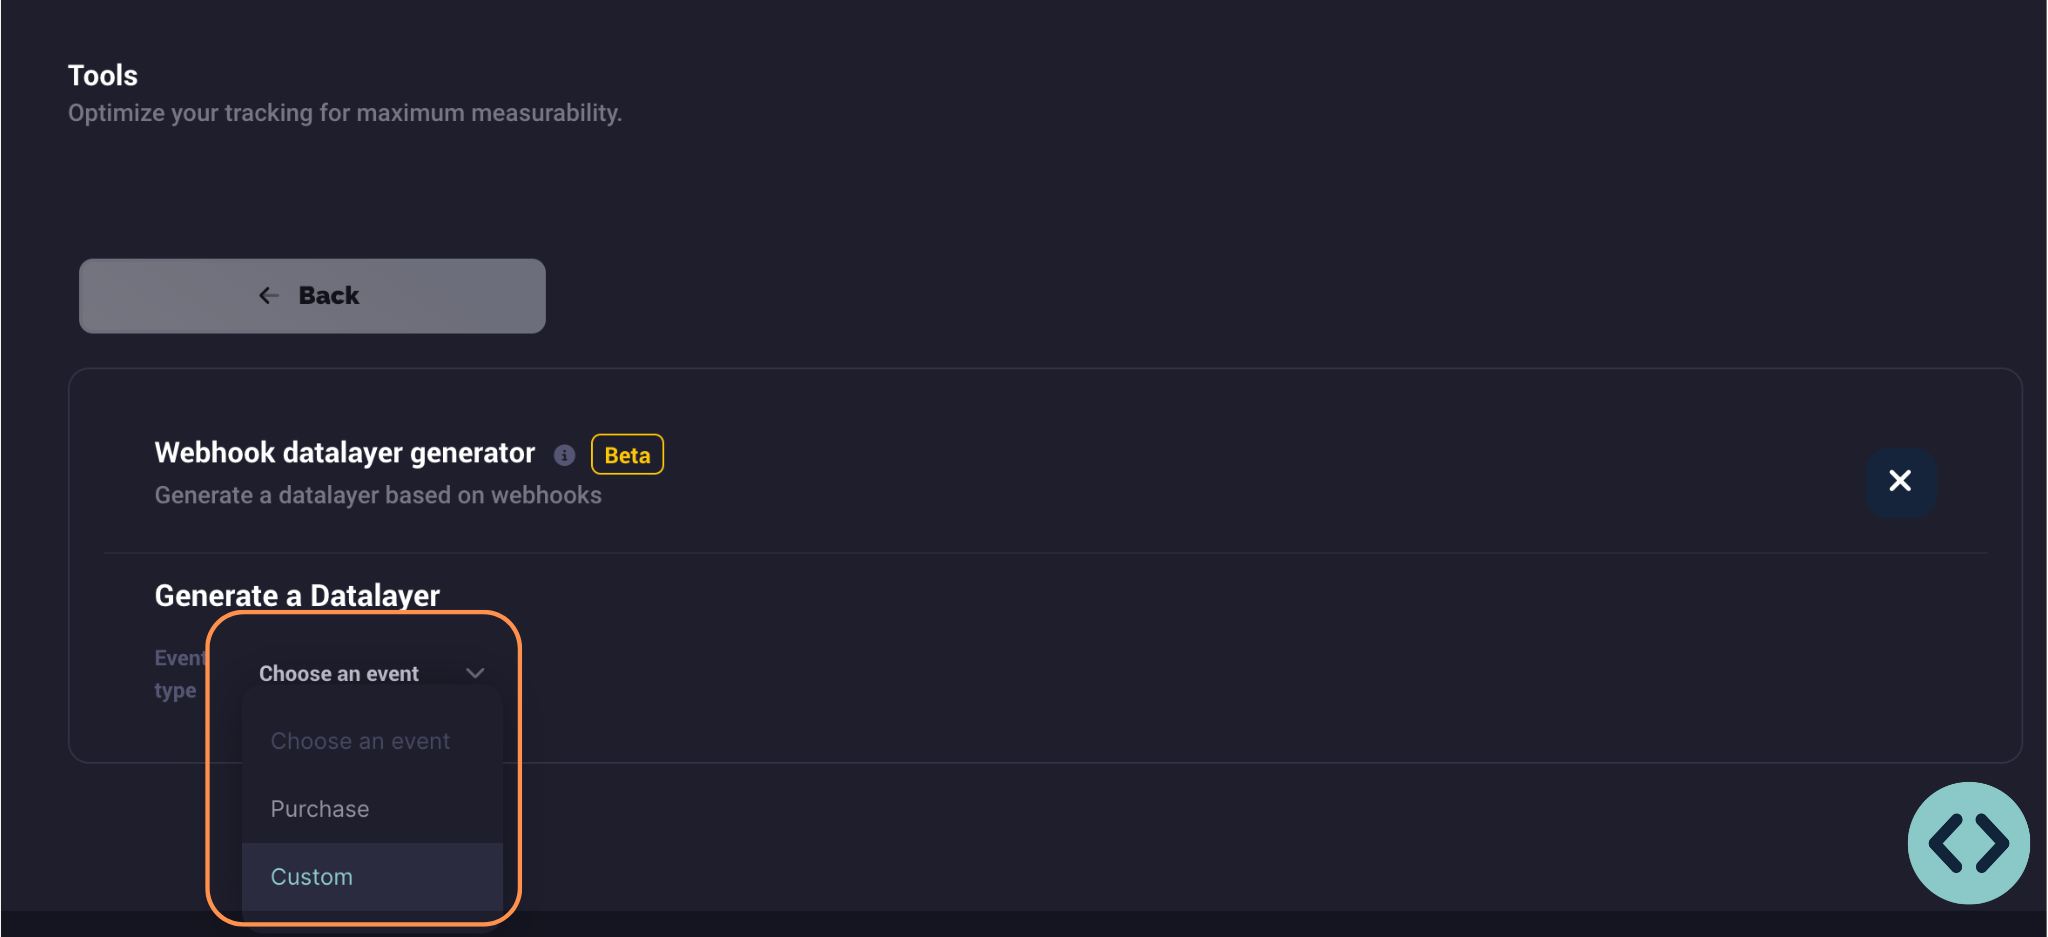
Select a standard event or create a custom event. A standard event is a preprogrammed webhook that already contains certain things, custom is all the way from 0.
3. Select parameters as desired
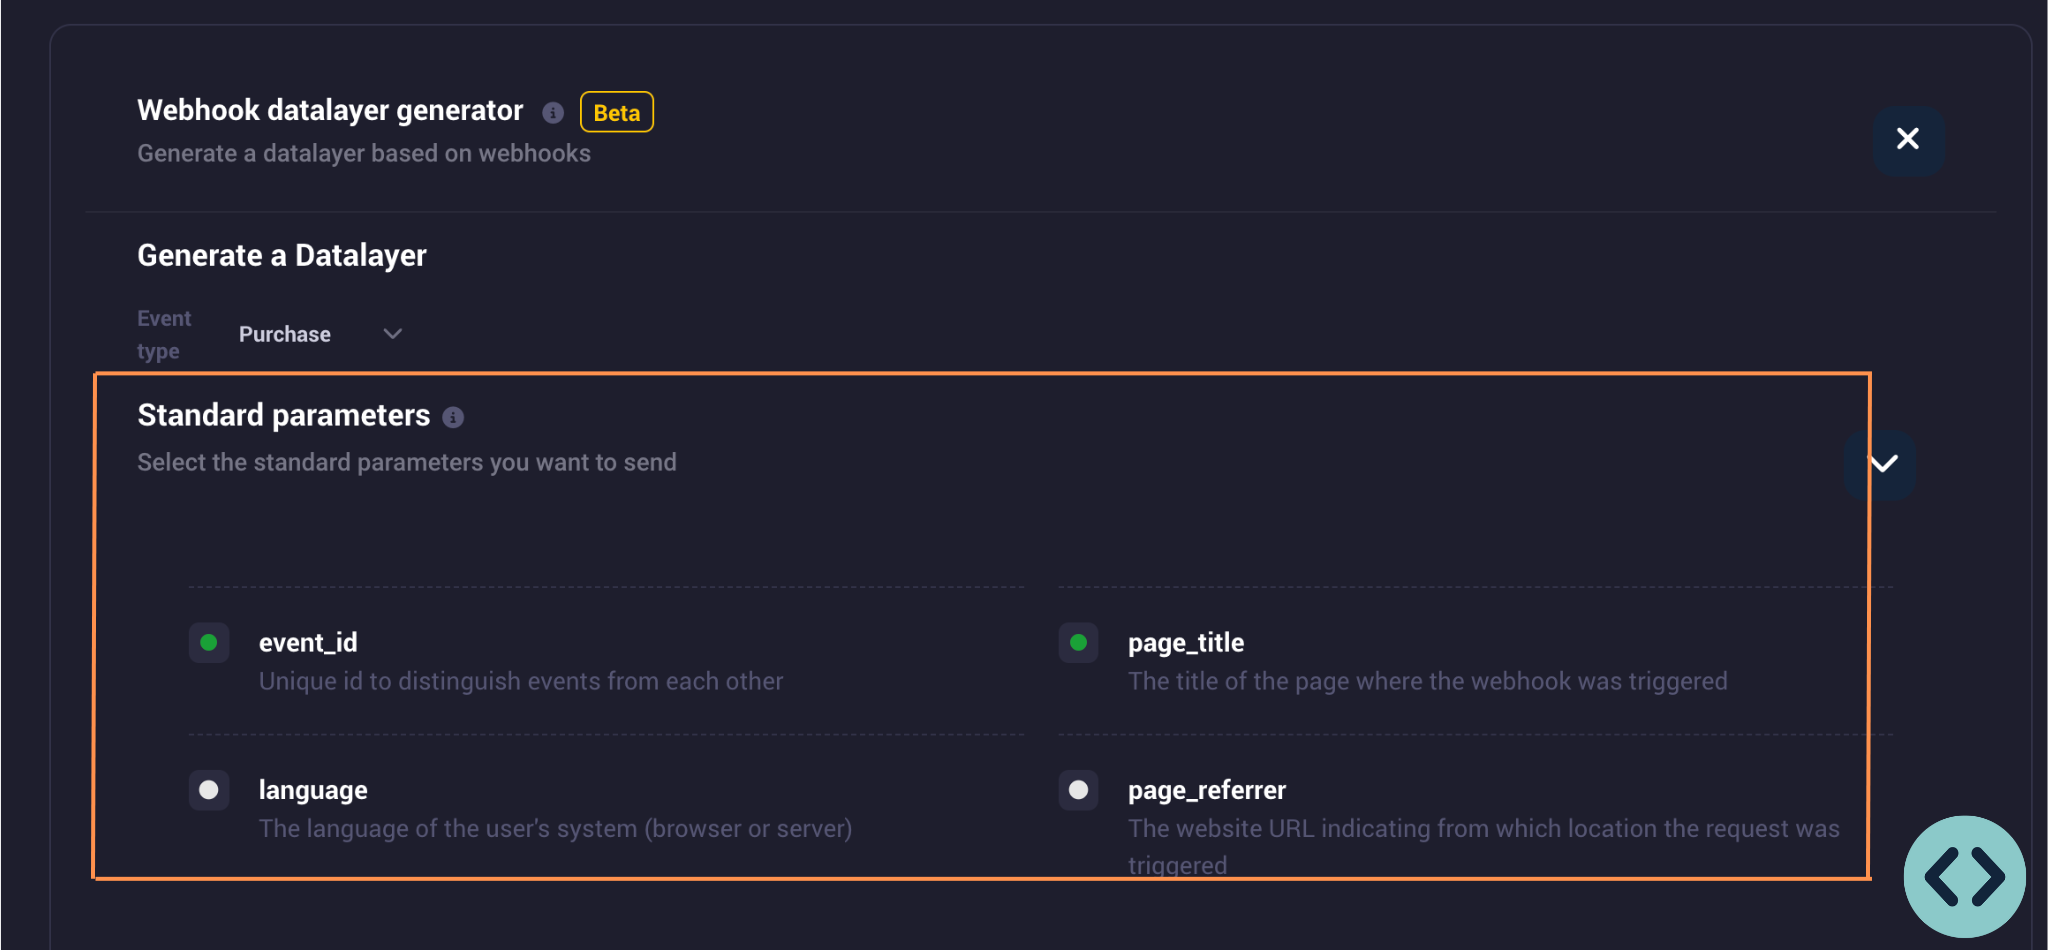
Next, the webhooks screen opens. Then select the default parameters as desired.
4. Enable Enhanced Conversions (Optional)

Enable the Enhanced conversions within the Webhooks tool if desired.
5. Add Custom Parameters (Optional)

Add any custom parameters within the Webhooks tool. This will be hardcoded into it.
6. Insert the Webhook Data Layer script
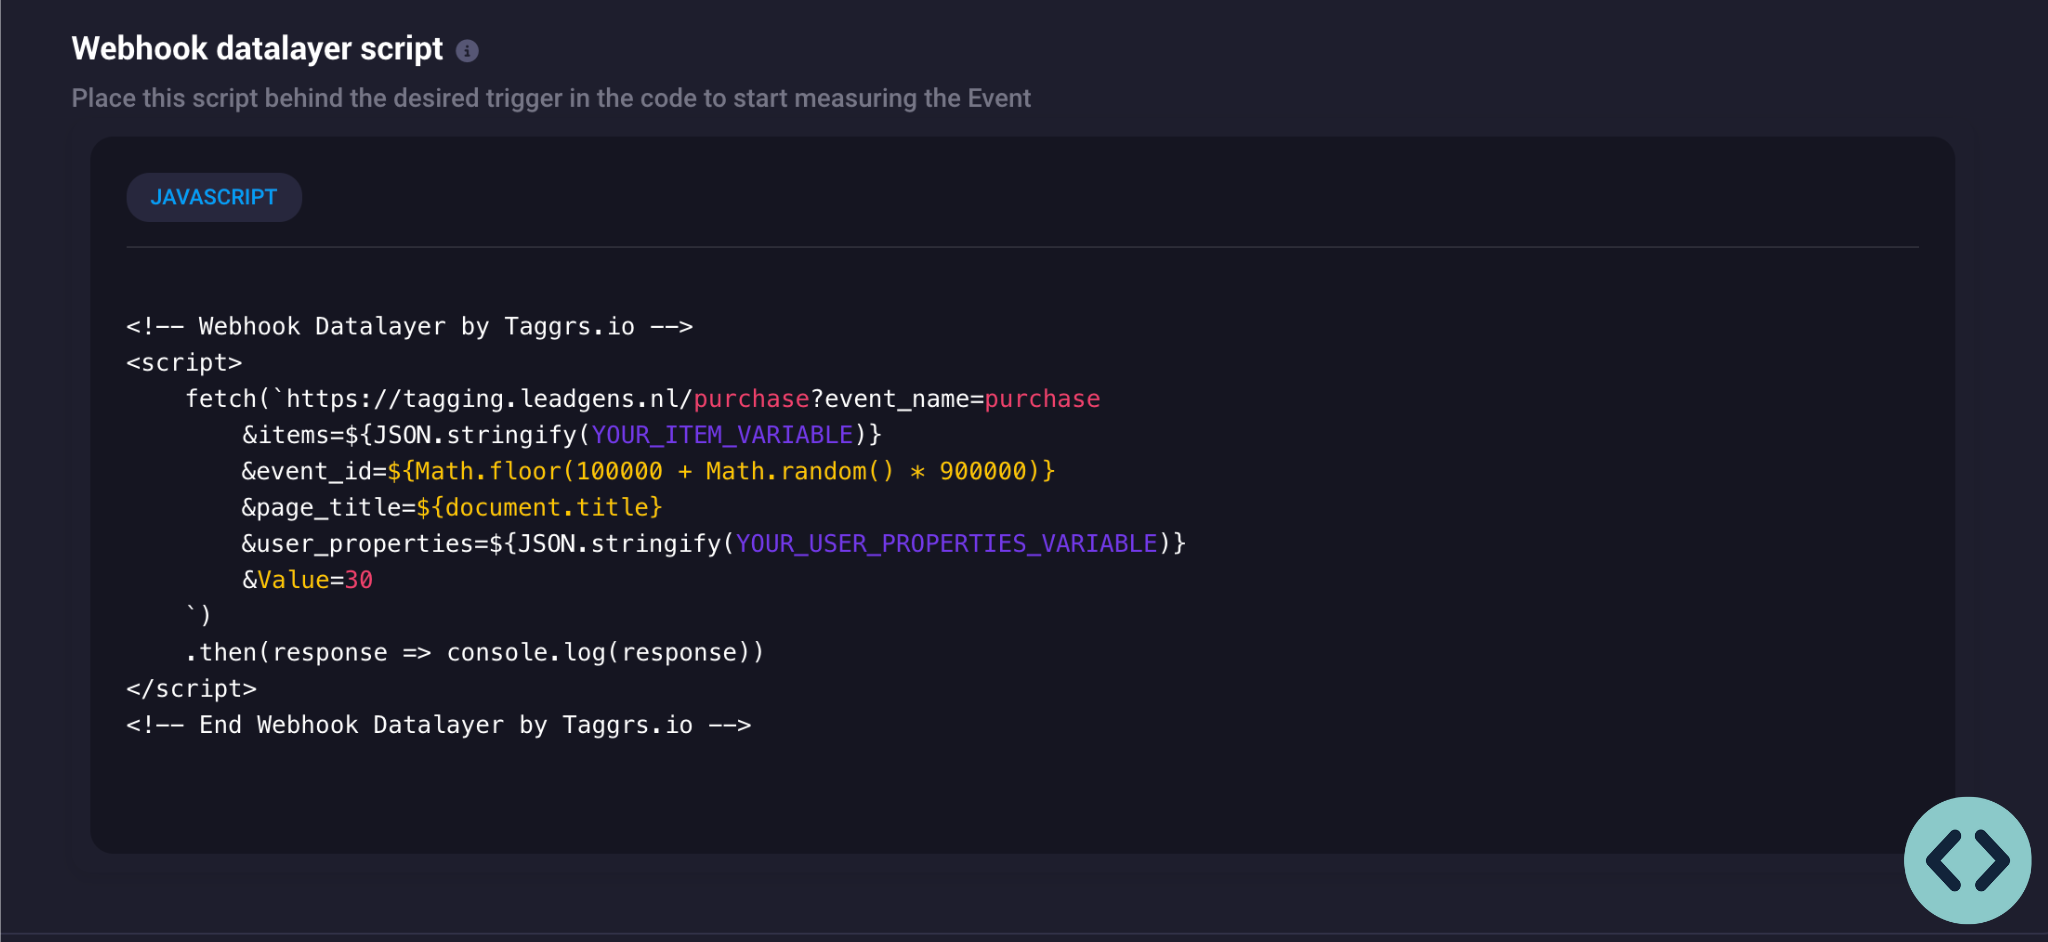
A Webhook dataLayer script is then generated based on the options entered. Copy this script and paste it on the website. Then, customize the script. The parameters in the Webhook must be adjusted based on the data and variables available on the web page. The current values in the webhook are placeholders and must be replaced with actual values.
7. Download TAGGRS Data Client
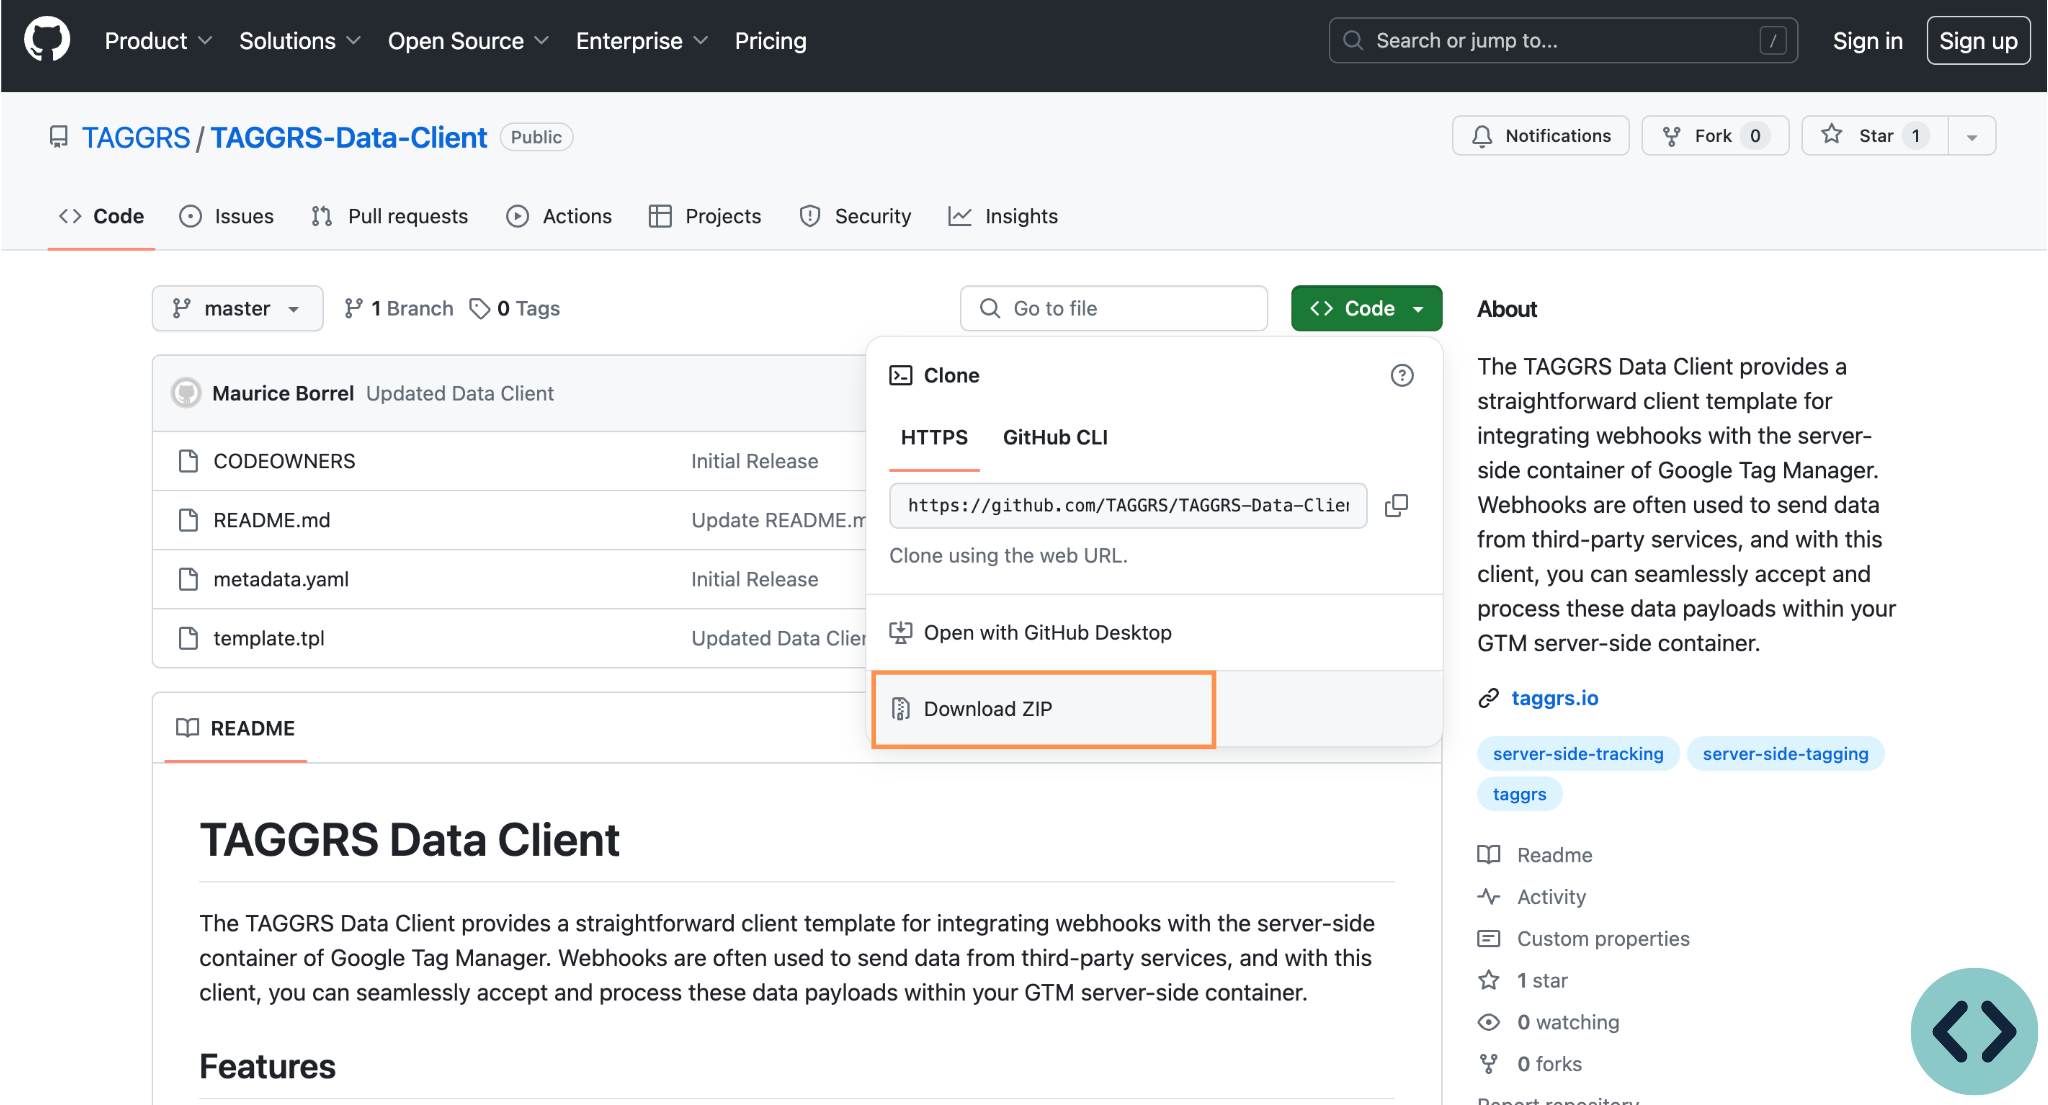
TAGGRS Data Client provides a simple client template for integrating webhooks with server Google Tag Manager container. To do so, download the TAGGRS Data Client from GitHub. u003cbru003eNote, the TAGGRS Data Client does not need to be installed if the Webhook represents a GA4 request. If this request is identical to a traditional GA4 event that normally comes into the client container from the GA4 tag, the GA4 client will pick it up automatically.
8. Import TAGGRS Data Client into GTM (Server Container)
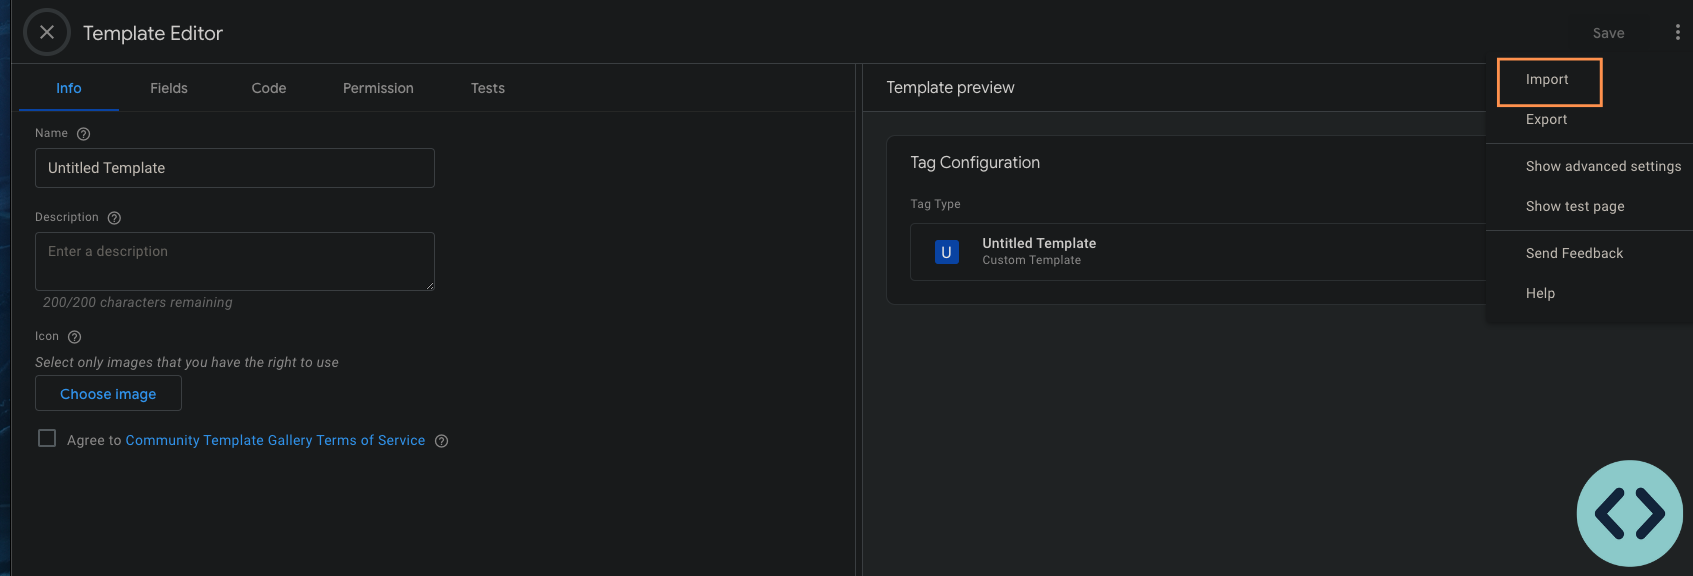
Import the TAGGRS Data Client to the server container under client templates and save it.
9. Create new Client (Server Container)
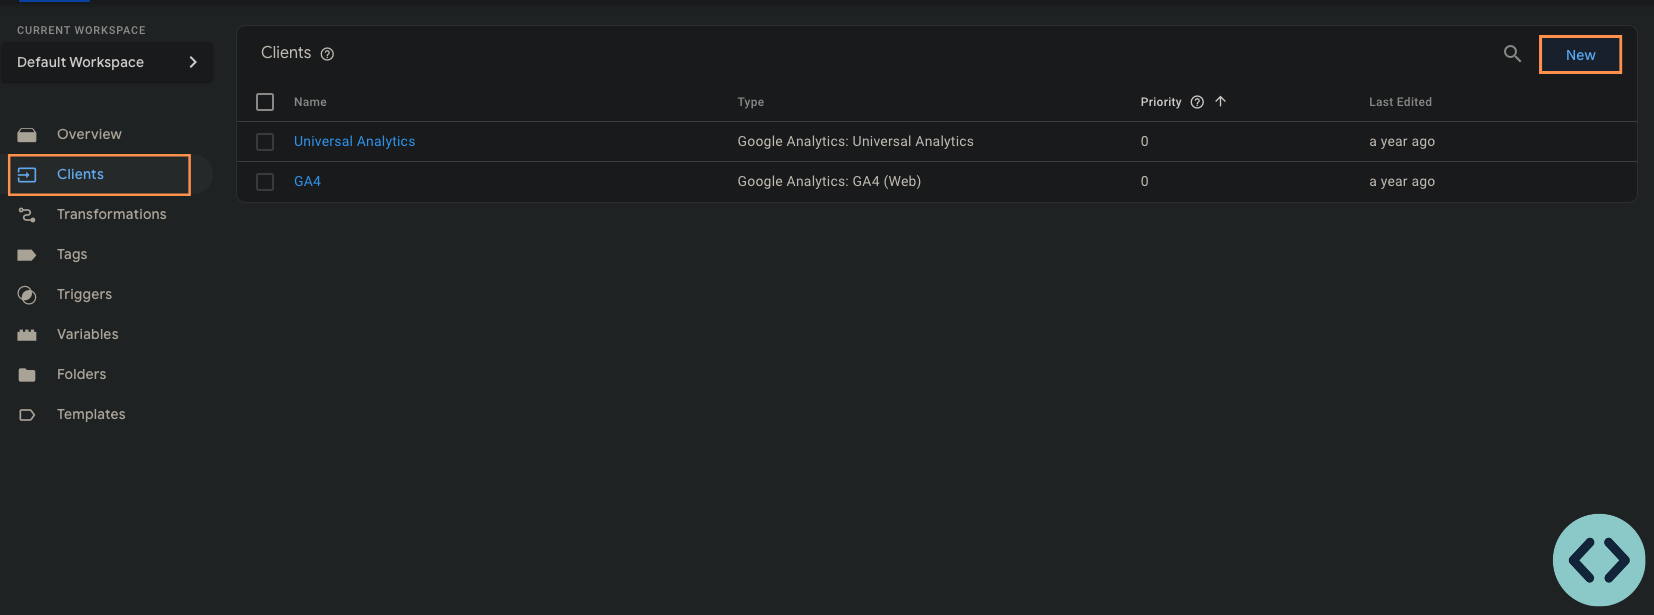
Under Clients, create the new TAGGRS data client by clicking New.
10. Choose client type
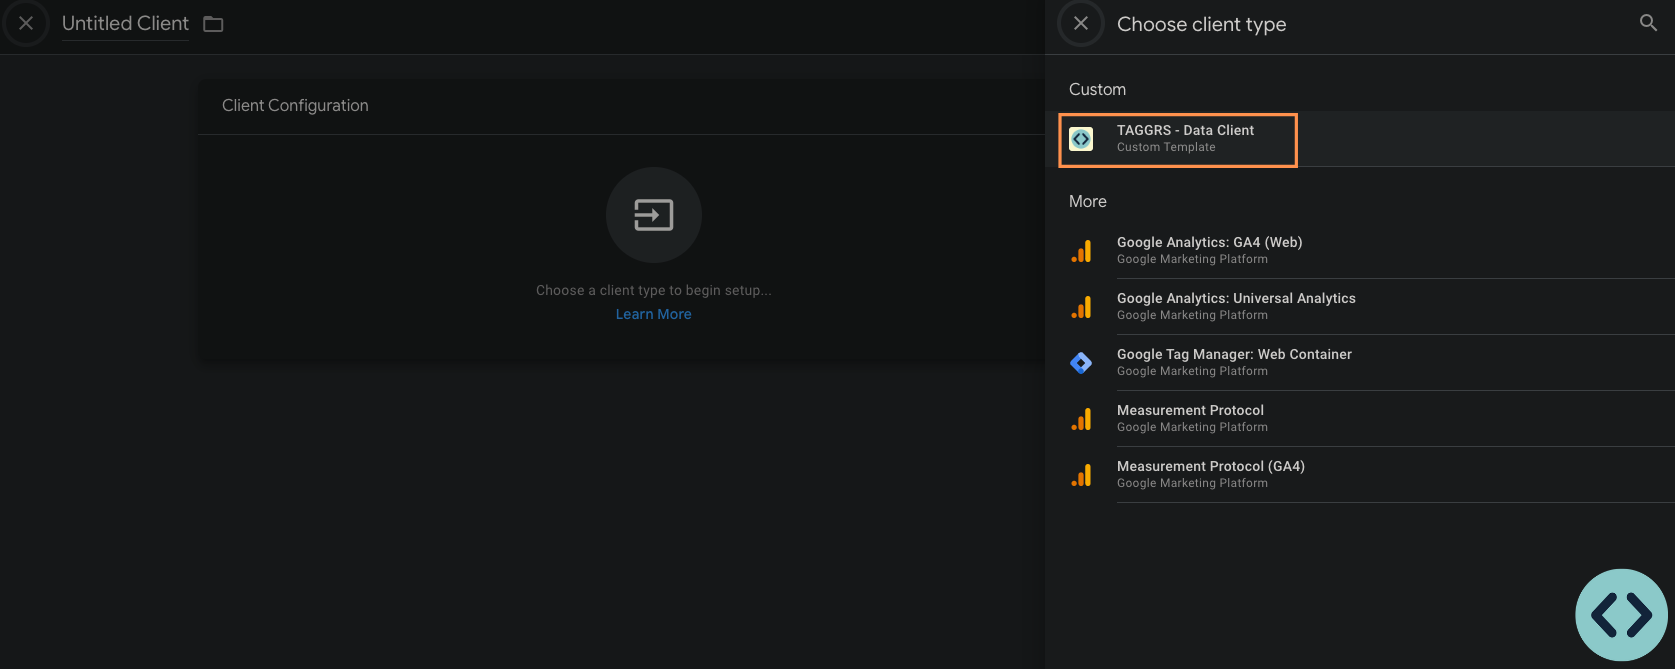
Next, select the imported template (TAGGRS Data Client) as the client type.
11. TAGGRS Data Client setup
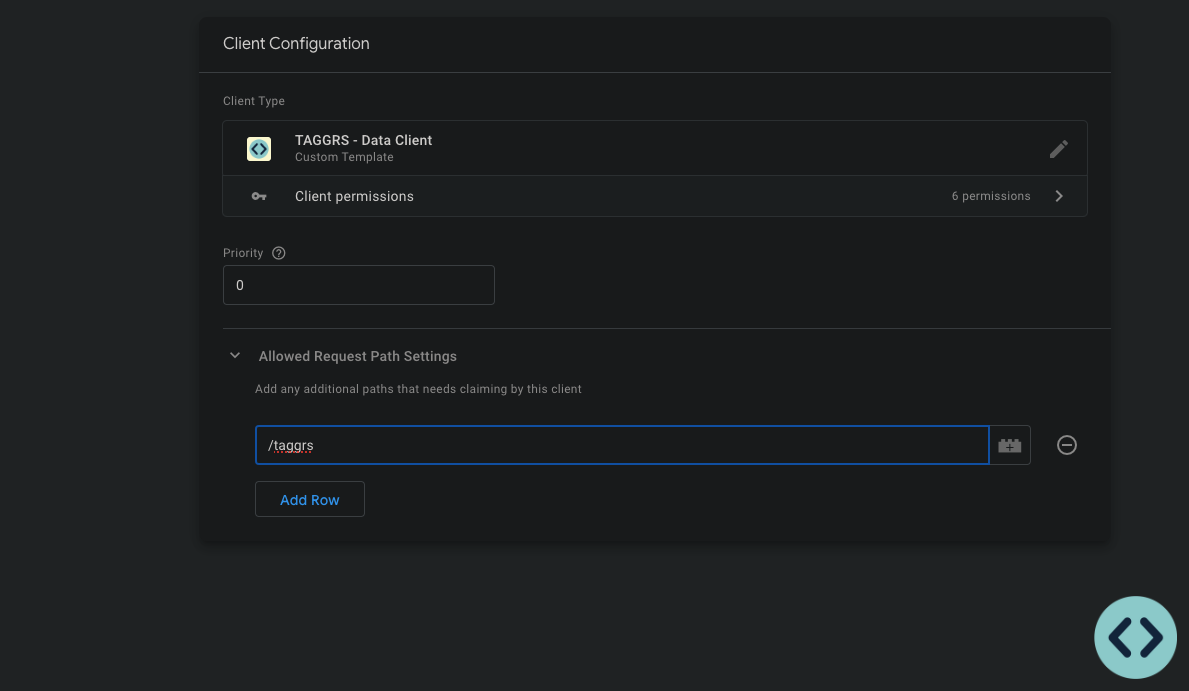
Under allowed request path settings, place the text that comes immediately after the first /. Importantly, this should only be the first word; anything that comes after the ? does not need to be here. Save the Client and then put the container live. You have now created your first default webhook URL.
Webhooks testing
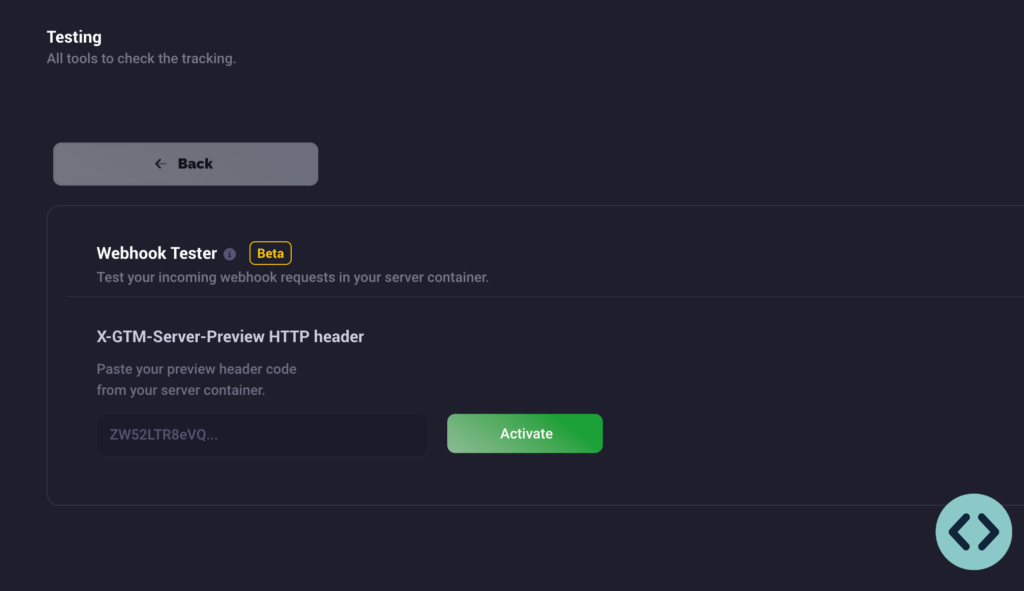
Want to test webhooks? To test the webhook, you can activate the TAGGRS webhook tester in the dashboard. Make sure your webhooks always function correctly and your data is processed reliably.
Key takeaways
- Webhooks are great to automate workflows among your platforms, like CRM, apps, and else.
- They enhance Server-side Tracking with near real-time data delivery and direct server communication, by being automated, avoiding common client-side roadblocks, and supporting data security.
- Webhooks are not universally compatible but they are flexible, connecting seamlessly different platforms.
- The TAGGRS Webhook Tool is one of many TAGGRS Tools. With real-time data transfer, improved reliability and increased security, TAGGRS Webhooks provide a solution for modern data integration needs.

